Friday, June 15, 2012

Market Skirt Pocket Tutorial


Market Skirt Pocket Tutorial


Another market skirt!  I can't seem to make enough of these little lovelies.. This time I was determined to add pockets, which has been a big 'fail' for me up until this point. Dana, from Danamadeit.com blog has great tutorials on both the skirt and a gathered pocket, but I was having trouble sewing the pocket on AFTER the skirt was together.  There are just too many gathers for me to be able to sew the pocket easily.  Or.. maybe I just need to re-read the tutorial one more time?  :D

I came up with a slightly different pocket design and and sewed the pocket on before constructing the skirt. It worked for me. Here's how the pocket came together.

Lined patch pocket


For 2 pockets I cut 2 front pieces (floral) and 2 lining pieces 6" square.  The size is arbitrary, but easy to cut with my 6 x 24 ruler.  Actually I think the original pocket was closer to 7"x6", because it ended up a tad bit wider and more gathering at the top (making it look almost circular).

The two front pieces were "fussy cut" to match.


I rounded off the bottom corners using a coffee cup my mom gave me.
(notice the caption?) 

All bottom corners are rounded.


If you wonder why I am using 1" casings... 
well, I have a LOT of 3/4" wide elastic!


For the casing I measured 1-1/2" down from the top of the pocket and marked with a pin, pinning again another 1" down.  These pins mark the openings for the casing.  You don't want to stitch between the pins for this step.

I stitched a 1/4" approximately from the pocket edge, all the way around, leaving  the 1" openings on either side for the casings. 
  
Now I have not seen this little trick on any blogs I've read so far, so this may be an old school method, and possibly new to you... 

when leaving an opening for turning, rather than back stitching, pivot and continue the stitching to the edge of the fabric/seam allowance.  

It's great for added strength, but the sweet part is, the opening is nearly invisible after turning and looks very finished.  Try this on the next item you have to turn.. like pillows, etc!


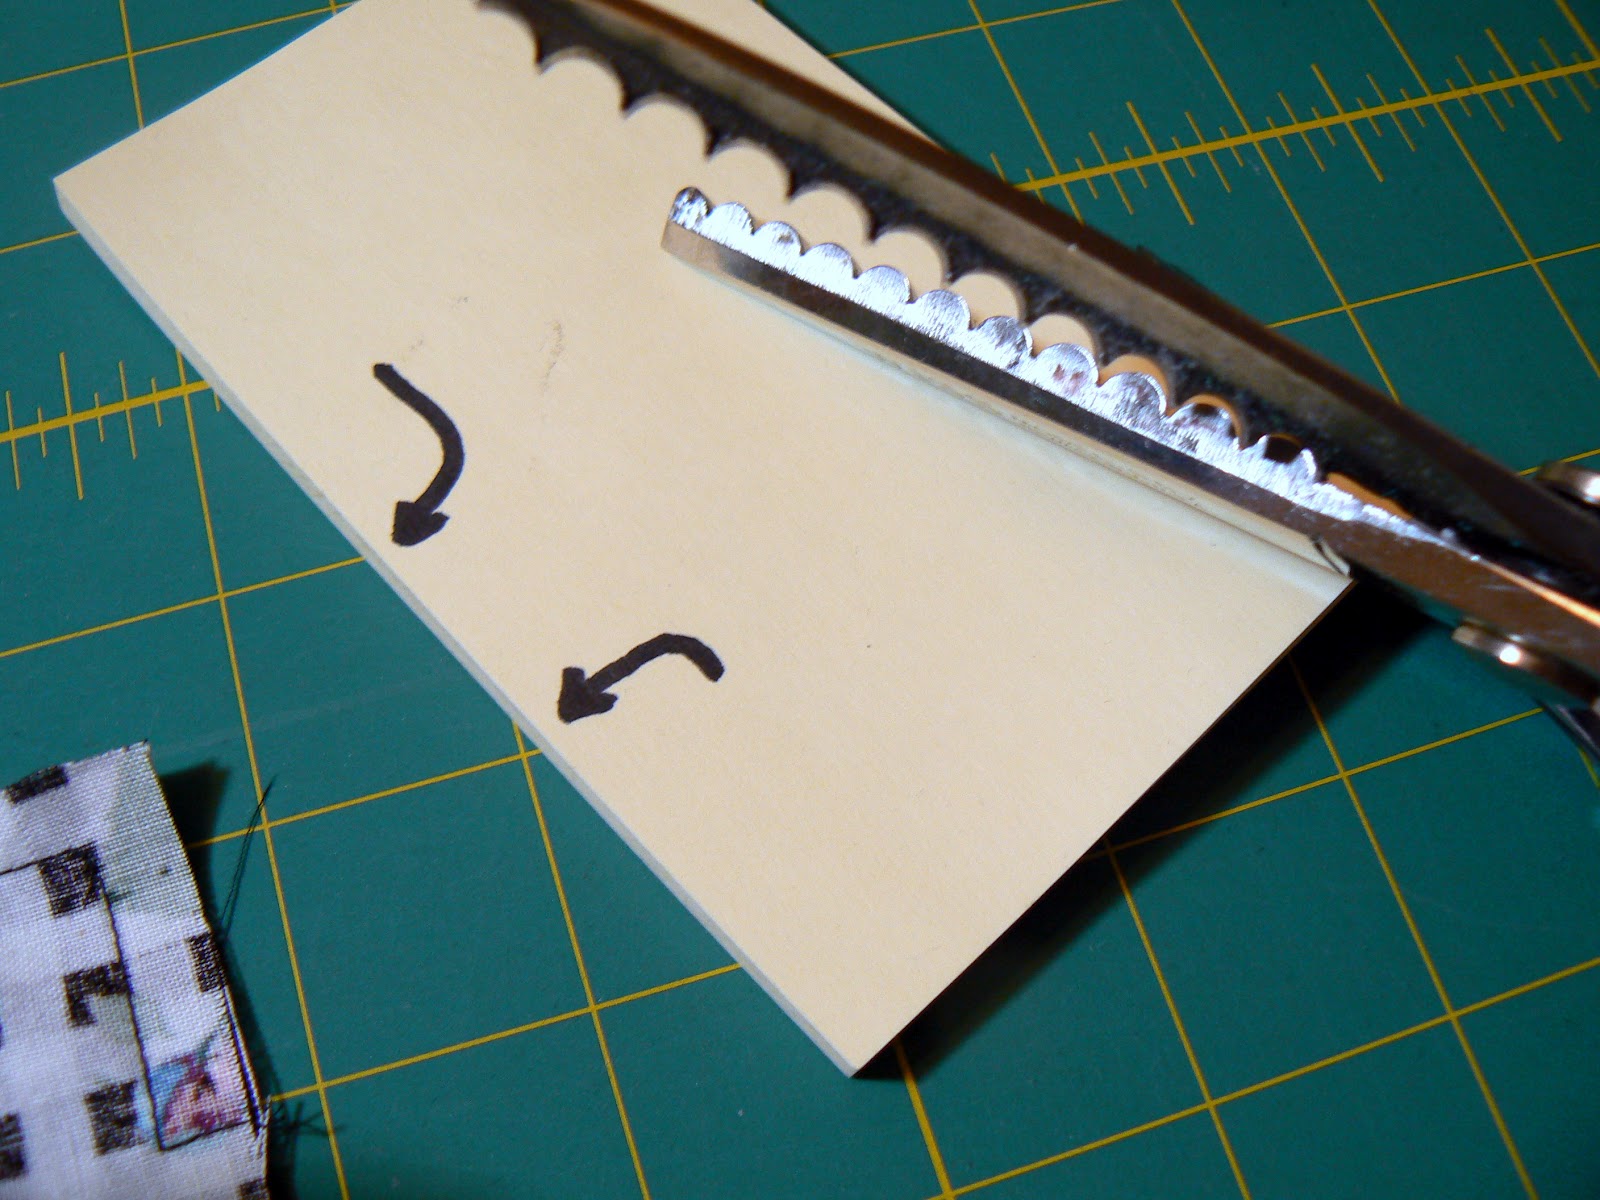
These are my scalloping shears... a gift from a wonderful seamstress friend, that lost her eyesight. I will always cherish these.   If you have a pair you can use them for trimming corners and curves!!  Pinking shears or regular shears work as well.  (please.. ignore the sticky note with the arrows.. it doesn't apply here) 

Great for corners  
(note that I took a diagonal stitch at the corner.. helps to make crisp corners once the fabric is turned to the right side)

Close to the thread, but don't clip your sewing!

Extra sweet for trimming curves!

Press your stitching before turning.  It sets the seam and makes for neat pockets.  (time to wash the ironing board cover again) 
Next I'm going to use one of the openings to turn the pocket right side out.


This is a tube turner. I think the brand name is Fasturn. I'm not sure if people still use them, but they are worth their weight in gold! I've had these forever, so I'm sure sure what method I'd use if I didn't.  You might try Eleanor Burns, of Quilt in a Day's method of using a large drinking straw with a ball-point bodkin..  or possibly using the eraser side of a pencil to push it through the opening would work too.  Or, you could have a 3rd opening ~at the top of the pocket and forgo the hassle ~ just remember my stitching tip for that opening too~  If you have a nifty method... please share!

Insert the tube through the opening to the far corner of the pocket.

Insert the wire (with the corkscrew end) into the tube and twirl the handle to the right to work through the fabric.  (Righty-tighty ~ Lefty-loosy)

The corkscrew is small/fine enough to go through the fabric without damaging it.  (I wouldn't try this with expensive or easily snagged fabric though ~like silk or satin!)

Gently pull the wire (with fabric) back into the tube. In this instance  you aren't  trying to  pull the whole pocket through the tube (you would do that for tubes or narrow ties)..... 

Just enough to be able to be able to pull the fabric with the tube turner, back out of the casing opening.  Carefully turn the handle on the wire (to the left) to release it from the fabric.  Then pull the pocket right side out.  Easy-peasy!

This is how the pocket looked freshly turned.   I usually have a chopstick around to poke out the corners, but hey, use what you got!  This paintbrush handle worked just fine.

Poke the corners out as much as possible without poking through your fabric, and work the round corners so they are nice and smooth.

See what I mean about the opening?  It's strong! And good thing, because turning fabric adds stress on the stitching there.

Look how nice it looks after a good pressing!  

Here is the pressed pocket.  
Now to add the casing and the elastic.

I double checked the measurement for the opening of the casing, and stitched 1" from the top of the pocket,...

And then again, 1" below that stitching.  Sometimes it helps to have a spot on your sewing machine throat plate to use as a guide for straight stitching. I'm using the far right of the metal part of my throat plate in this instance.  Or you could use your preferred way to temporarily mark the fabric.

Six inch lengths of elastic were cut for each pocket. 

Since we are gathering the pocket, and eventually cutting off the excess, 6 inches is more than enough.

Thought you might like to see the back of the pocket... !  

Mark the center of the elastic... and then mark where you are going to eventually cut the elastic (equal distances from the center mark).  If you want more gathers in the pocket, then you will mark your cutting line closer to the center line.  At this point you can play with it to see how you like the look the elastic creates.  I mark the elastic identically on both elastic pieces so matching pockets actually match!

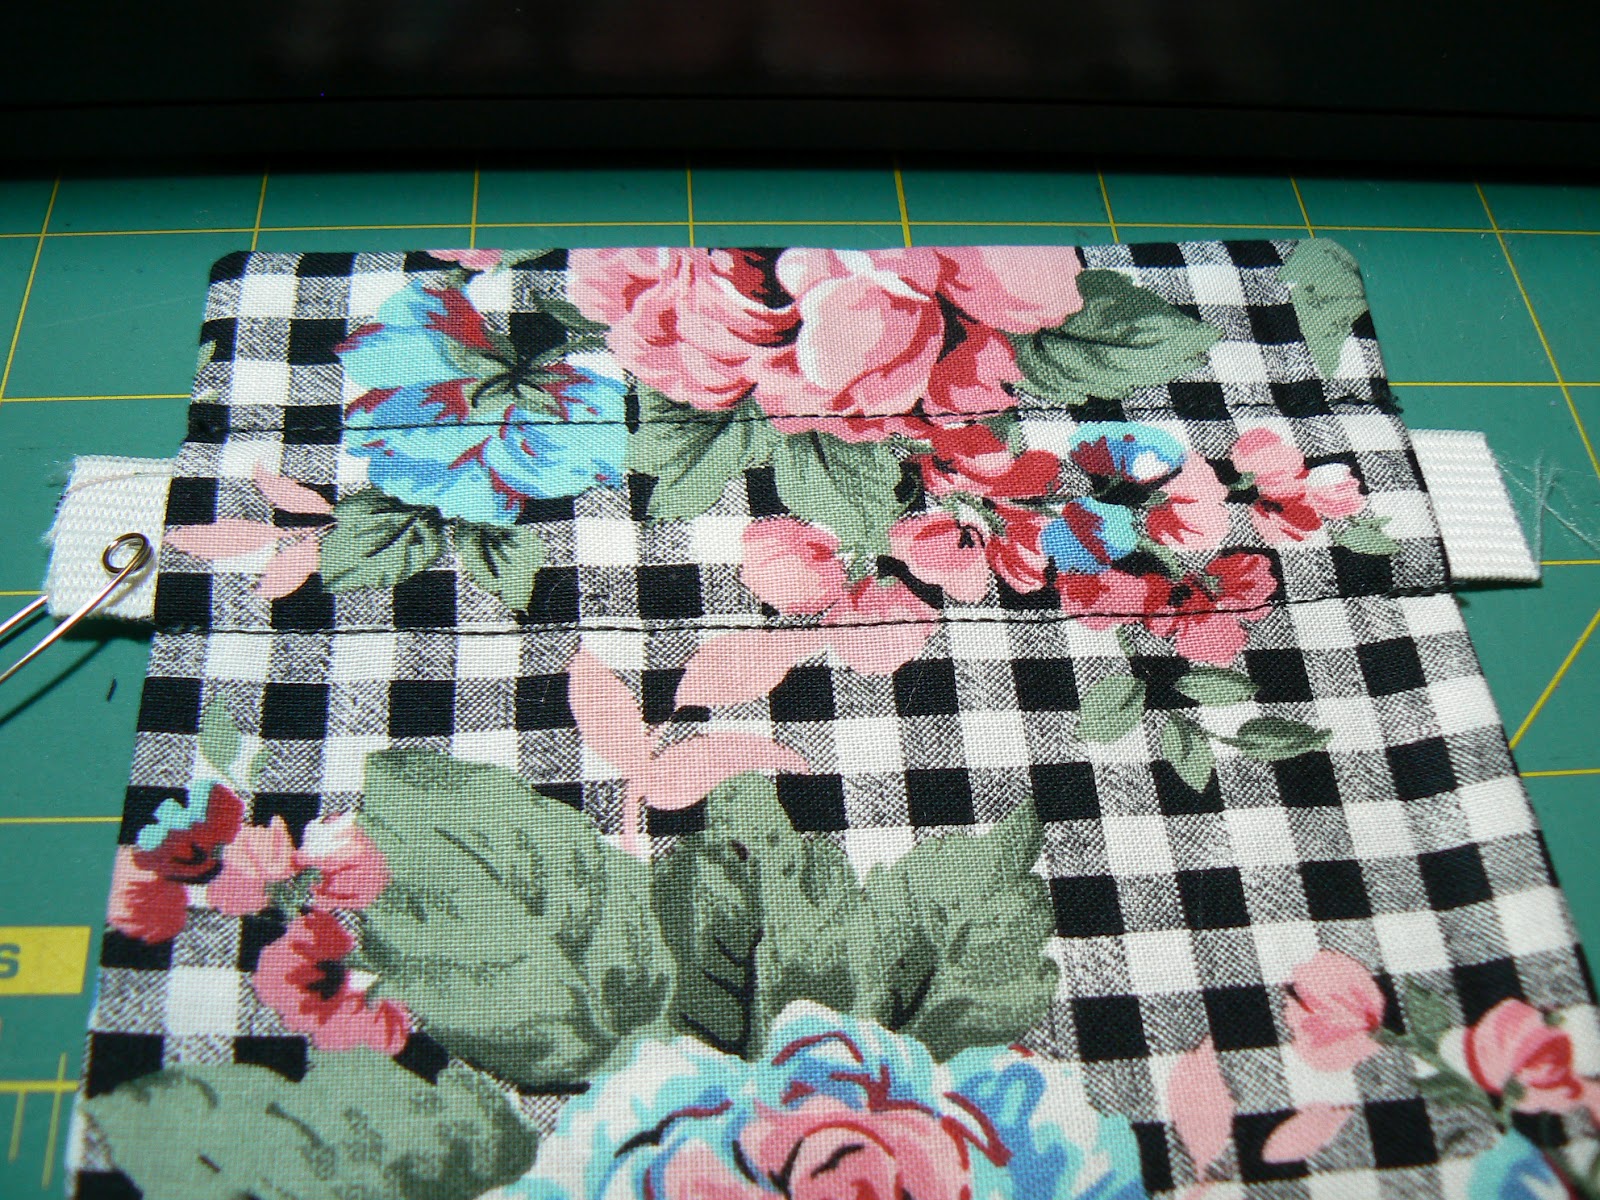
Put the elastic through the casing with the extra on each side.

Line up your cutting line right next to the edge of the pocket, and pin the elastic in place.  You might want to pin further than I have, to allow you to stitch the elastic in place without removing the pin, to prevent the elastic from shifting.  Then stitch/double-stitch the elastic in place ~just stitch the casing area for this step. (1/4" seam is good, or however wide a seam you will be using when you top-stitch your pocket onto the skirt).

Here's another view of the back side of the pocket.


You can see your cutting line when you tug on the elastic after stitching it in place.   So when you DO cut the elastic,  it won't be visible.

I pushed the gathers to the center of the pocket to give me some stitching room to sew down the elastic.  (Sorry, I should have trimmed my threads before taking this picture.  Looks a bit messy!)


And there you have it.... a finished, lined pocket! ready to be top-stitched onto your market skirt.  Once your pocket is stitched onto the skirt, you can take out the pins and distribute the gathers evenly.

As far as placement on the skirt, determine where the center front is on the skirt body.  Eyeball how far you think the pockets should be from the center, or measure half-way between the center front and the sides.  Give enough room on the top and bottom for your waistband and ruffle seams, pin in place.  Top-stitch as close to the edge as you like (stitching over your previous stitching on the elastic casing) and reinforce your stitching at the top corners of the pockets for added strength.  Then continue constructing the skirt as instructed in Dana's tutorial.  

~*~

Please let me know if you have questions or suggestions about any of the steps.  (This is my first tutorial).  If you use my tutorial I'd like to know what you think, and how your project turned out.  Hope you liked it.  


Here's my little twirling granddaughter & her daddy (my SIL) at the wedding last summer!  The dress she's wearing is the inspiration for (and she's the recipient of) this particular market skirt!  Can't wait to see her again~ hopefully next month!

hmmm... gingham on the bias!  I'm making a mental note of that!  :D


Sunday, June 3, 2012

If it's the first week in June, it must be... da BOM

Here are my renditions of the two (BOM)blocks for June:  The Greek Cross, and the Octagon.  

This month it was all about getting my scant 1/4" down to a science. I measured my seams before hand this time, and pinned so all the seams matched perfectly.  I think I missed one seam, but didn't notice until I was examining the photos. 

[Add in note here: Amy Burg (of Craftsy's BOM) mentioned that half-square triangles on the bias are forgiving, so if your seams didn't match up just so, you could remove just the stitches around that seam and re-position.  So I tried it.  And it works!  My seams all match now on the Greek Cross.  I may have to check out my other blocks for mismatched seams now too.]

So it's been a skill lesson for me.  My blocks came in right at 12-1/2" with only minor trimming to neaten up the edges.  Hooray!


Greek Cross
The black Kona is my background fabric; the floral fabric is from my stash.
The green chevron was my son Ricky's pick, from the Boho Fat Quarter Bundle by Free Spirit.  I bought it at the start of the BOM,  just in case my stash wasn't cutting it  I freaked out and decided to totally copy-cat everything Amy did.  I love the chevron.

Octagon Block

Kona in black for the background and one fat quarter of batik.  Who doesn't love batik?  I have received more feedback on this block...(and every other block that has batik in it).  I think it's that 'glow factor' batik has.
I took daylight pics today ~ They turned out much better.

~*~


In other news, our family got to celebrate Raine's 30th birthday last Memorial Day weekend, because her wonderful hubby surprised her with plane tickets home to be with all of us!


We had a wonderful time with nearly all the family together, and a bunch of Raine & Ryans' friends.  The volleyball net was set up in the park, and I even got in a volleyball game or two!  There was swimming, barbecue,  celebratory shots, and lots of love and laughter!  It was fun! 


When I gave the halter top to my daughter for her birthday, I told her that I made a similar halter for myself 40 years ago (or more) from the very same pattern, and she loved it, and Ryan loved it.  He actually liked the gingham side best...   

I also gave her the Mug-rug to the Stars and gave Ryan a mug-rug I made for him with two bow-tie blocks... Ryan rocks bow ties (a lot) as you can see from their wedding pic above.  


Hopefully they will be sending me pix as we didn't have time to take one of Ryan's mug-rug, or see the halter top on Raine.   


My current WIP list include: 

  • applying hook & loop tape to my many coffee cozies I made weeks ago;
  • tweaking my serger so I can finish the lettuce edging on some tank tops I made for the g-baby girls; 
  • and welder's caps.  Welder's caps?  Well I have a friend who says there is a great need for welder's caps, in all kinds of fabrics... (that appealed to me) so I'm going to see if I can put some together for him and hopefully they'll fit.  
  • Oh, and I have some baby bibs I've been making over the years that are extra generous in size... just need to work on completing the last step.. the closures around the back side.  I'll post pics later on those.
I am still waiting to hear that my sewing machine is ready to be picked up...fortunately my old Pfaff 1471 has a new shiny power cord, and I'm back in business.  


Yesterday I stitched the two blocks for Crafty's Block of the Month-BOM... on the heels of learning that Amy Gibson, our instructor, unexpectedly found out she's expecting twin boys!  [Amy's blog: Stitchery Dickory Dock]   So there is much more excitement buzzing around her news than the blocks, (even though the blocks are fantastic) ... 

I know the range of emotions she must be going through right now.  I've been there ~done that, have the t-shirt (and the gray hair) to show for raising twin boys!  I'm smiling... but logistically you have just run out of hands, simple things instantly become monumental (try grocery shopping, feeding and diapering, laundry, and just holding your children's hands for instance!) and as my twins got a wee bit older... omg what one of those boys didn't think of, the other did!  And still do. But what a crazy wonderful experience it's been.


My kids... 23 years ago!
Raelani, Raine, Robin
RJ & Ricky (the twins)

RJ & Ricky  "the twins" today


Four generations of smiling faces at Raine & Ryan's wedding last summer.
Something to be said when your immediate family requires wide angle lens!


I wish Amy and Russ (and their two darling girls) all the joy, health & happiness these two additions could possibly bring!

~*~

Hope your day and weekend have been sew awesome!  

Sunday, May 13, 2012

I am officially out of business...

I am officially out of business...  for a while anyway.  


My sewing machine needs medical attention, my spare is missing the power cord (which led to a scavenger hunt today) and I would really like my serger tuned up so I can get those nice lettuce edges for a couple of knit tops I'm making for the granddaughters.   I'm taking them to the shop this week.  It could be a couple weeks before I see them again :^(   So I guess I should use the time wisely and organize my space, maybe even find the missing power cord?  Sure yeah, that's the ticket!  

So I thought I would take this time to post some of my antique/vintage/just old items I have collected or inherited from friends and family.


I saw this pink sewing basket on Pinterest...
all nicely displayed in a beautiful sewing room.


Here's mine...

This is MY round wicker sewing basket.  
My mom gave this to
me when I was still a teenager.  
It was either hers, or my grandmother's. 
This is circa 1940's I believe.


It has a nifty little thread shelf with wooden pegs, and space below for...
oh wow there's my embroidery hoops ... I've had those since grade school...!


another view


This is the manufacturer... You can still find info about them online.
This sewing baskets came in yellow, pink, blue, green, all with matching cords.
I'm going to have to find a place of honor for this!  :D


My mom is ecstatic that I'm back sewing again.  I "helped" her sew when I was little by standing behind the sewing machine and lifting the presser foot lever when she told me to.  My mom was self-taught.  And she made a lot of my clothes as I was growing up.  Including winter coats.  I don't think there is much my mom couldn't tackle or figure out how to do on her own.   Downstairs in her basement is my grandmother's buffet, drawers filled with old (vintage and probably antique) sewing notions and patterns from her years of sewing, and maybe a few hand-me-downs from my grandmothers as well.  I have a few of them.

I caught the sewing bug from mom.  My parents asked me what I wanted for high school graduation.  I got a brand new Brother sewing machine in a cabinet.  1972.    The fun of sewing was making outfits no one else had.  Funny story though, my friends and I took a bus into downtown Kansas City (I lived in the KC area growing up) and I saw a girl wearing the same culotte outfit I made, and in the same material!!  What are the odds of that?  :D

And at that time a lot of my friends were sewing too.  My mom made my homecoming "Juliet" dress out of green velvet.  She made my little sister's flower girl outfit for my wedding.  My bridesmaids sewed too... so they made their outfits as well. 

Anyway... here are some of the buttons that were in my yellow sewing basket...


Kinda creepy huh?  I have no idea what these were meant for...
my son calls them the Cruel-la DeVille buttons!


And for all of you who have been hearing about when a loaf of bread was a nickel, and gas was 25 cents a gallon....  here are some more items with the prices that will amaze.   I liked that you could buy buttons like you buy screws at the hardware store...  just choose what you want, the clerk put them in an envelope, with the price written on the outside.


I have more... I'll be adding later, especially if my machine is laid up for a while!


Wednesday, May 9, 2012

Flip-Flop Market Skirt

I promised to post the market skirt I finished over the weekend.  I should put "finished" in quotes... I think I'm going to add another layer of ruffles... somehow this one seems a bit shorter than I imagine my little granddaughter would be wearing now.  Hopefully I'll be able to see her (and her parents) soon...  I miss them oodles.


I'm not sure if I explained before... but I've been using up some pretty ancient stash to make these market skirts.  I love this light blue fabric, and I've been using it up.  However, there was a spot or two on the cuts for this market skirt, and I thought it wouldn't show after I got it together.  Wrong.  So I thought about pockets for a minute, and I remembered seeing some cute outfits with flip flops on the bottom of them, like a border.  I decided to give that a shot.  My son drew a flip flop shape for me, and I proceeded to cut out the shapes with my scallop shears...


I stacked the print and the blue solid, and basted the shapes onto the skirt with a machine basting stitch.  Next was outlining the shape with yellow embroidery thread, using my machine's blanket stitch (it could have been any stitch) to give the flop some shape.


Next was the fun part..  making the toe sling (or whatever you call the part that goes between the toes).


I have an assortment of trims I picked up at a sale..with the g-baby girls in mind, and one was blue sequins.  Normally I "save" this for some undetermined occasion and never use it... hence my stash!  This time I brought out the 'bling'.  I could have just stitched it down, but being playful with it paid off.


This is the length of trim I was working with.
I centered the trim across the foot, where I thought the toe-piece should go.

I used the button stitch on my machine (a zig-zag stitch set a zero length works too) and
 placed a straight pin over the top of my presser foot to sort of create
a 'shank' where the toe piece would be.


Here is a closer view of what I mean.


another view


After that, I removed the basting stitch and added another row of blanket stitches (this time in blue) to give the flip-flop
a little more ump and secure the outside ends of the sequin trim.


I AM seriously considering adding another ruffle to the bottom of this skirt.  I'm out of the cute yellow and blue fabric, I may have enough of the blue for another ruffle for the bottom... maybe I'll add some more bling... (or should I save the trim for something else???)  heh heh


UPDATE:  I did.. I did add another ruffle in co-coordinating fabric.


Sunday, April 8, 2012

Completing projects...


Made a new top (reversible) for my g-baby in Florida...
this time I added the pocket in front
This weekend was a sew holiday for me... and I got to complete some projects and plan on more to come.


I also got my order in the mail for Rowan "Water" from Kaffee Fassett Collective.  Oh such gorgeous fabrics... and FAT quarters!  Opening this package had the same affect on me as chocolate.. (and you KNOW that's saying something!).


I also found several items put in safe places, and some right where they were supposed to be.  So the organization efforts are moving forward slowly.


While looking in my grandmother's button box, I realized I have some really cool old items.  So, soon I'll take them out and snap some shots.  Some of the buttons still on cards will be fun to share.  Other buttons were picked out like screws at a hardware store and put in a small envelope with the price written on the outside...  I won't say anymore until I have some pics to share.


Hope your weekend was everything you wanted it to be!  


Here's what I did this weekend...
sneak peek at some of my vintage buttons on cards... 10 cents!


Figured out my buttonhole functions on my Pfaff.
I read my owner's manual on the bus this week!  lol

measuring for the buttonholes to match 


only scary thing about this, is that my g-baby is so far
away, and I can't have her try it on to see if it fits
(especially for button placement)
~and especially the hugs I'm missing!


I figured out how to make the top reversible.  I plan to make more
green gingham pieces to go with it.  This is the back.


Back of the top in blue^


Back of the top in the floral^
I know I've posted pics of this outfit before, but
I finally got the buttonholes right.. and can
show you the 'reversible' aspect :D


Update:  You know when you make something (at least I do) that you press and sew and press and sew and press again, with starch even!  Alas, my daughter most likely doesn't own an iron... LOL, so keep that in mind as I post these pics my daughter took of my grandbaby/model today.


my handsome grandson who is an awesome big brother