Sunday, May 13, 2012

I am officially out of business...

I am officially out of business...  for a while anyway.  


My sewing machine needs medical attention, my spare is missing the power cord (which led to a scavenger hunt today) and I would really like my serger tuned up so I can get those nice lettuce edges for a couple of knit tops I'm making for the granddaughters.   I'm taking them to the shop this week.  It could be a couple weeks before I see them again :^(   So I guess I should use the time wisely and organize my space, maybe even find the missing power cord?  Sure yeah, that's the ticket!  

So I thought I would take this time to post some of my antique/vintage/just old items I have collected or inherited from friends and family.


I saw this pink sewing basket on Pinterest...
all nicely displayed in a beautiful sewing room.


Here's mine...

This is MY round wicker sewing basket.  
My mom gave this to
me when I was still a teenager.  
It was either hers, or my grandmother's. 
This is circa 1940's I believe.


It has a nifty little thread shelf with wooden pegs, and space below for...
oh wow there's my embroidery hoops ... I've had those since grade school...!


another view


This is the manufacturer... You can still find info about them online.
This sewing baskets came in yellow, pink, blue, green, all with matching cords.
I'm going to have to find a place of honor for this!  :D


My mom is ecstatic that I'm back sewing again.  I "helped" her sew when I was little by standing behind the sewing machine and lifting the presser foot lever when she told me to.  My mom was self-taught.  And she made a lot of my clothes as I was growing up.  Including winter coats.  I don't think there is much my mom couldn't tackle or figure out how to do on her own.   Downstairs in her basement is my grandmother's buffet, drawers filled with old (vintage and probably antique) sewing notions and patterns from her years of sewing, and maybe a few hand-me-downs from my grandmothers as well.  I have a few of them.

I caught the sewing bug from mom.  My parents asked me what I wanted for high school graduation.  I got a brand new Brother sewing machine in a cabinet.  1972.    The fun of sewing was making outfits no one else had.  Funny story though, my friends and I took a bus into downtown Kansas City (I lived in the KC area growing up) and I saw a girl wearing the same culotte outfit I made, and in the same material!!  What are the odds of that?  :D

And at that time a lot of my friends were sewing too.  My mom made my homecoming "Juliet" dress out of green velvet.  She made my little sister's flower girl outfit for my wedding.  My bridesmaids sewed too... so they made their outfits as well. 

Anyway... here are some of the buttons that were in my yellow sewing basket...


Kinda creepy huh?  I have no idea what these were meant for...
my son calls them the Cruel-la DeVille buttons!


And for all of you who have been hearing about when a loaf of bread was a nickel, and gas was 25 cents a gallon....  here are some more items with the prices that will amaze.   I liked that you could buy buttons like you buy screws at the hardware store...  just choose what you want, the clerk put them in an envelope, with the price written on the outside.


I have more... I'll be adding later, especially if my machine is laid up for a while!


Wednesday, May 9, 2012

Flip-Flop Market Skirt

I promised to post the market skirt I finished over the weekend.  I should put "finished" in quotes... I think I'm going to add another layer of ruffles... somehow this one seems a bit shorter than I imagine my little granddaughter would be wearing now.  Hopefully I'll be able to see her (and her parents) soon...  I miss them oodles.


I'm not sure if I explained before... but I've been using up some pretty ancient stash to make these market skirts.  I love this light blue fabric, and I've been using it up.  However, there was a spot or two on the cuts for this market skirt, and I thought it wouldn't show after I got it together.  Wrong.  So I thought about pockets for a minute, and I remembered seeing some cute outfits with flip flops on the bottom of them, like a border.  I decided to give that a shot.  My son drew a flip flop shape for me, and I proceeded to cut out the shapes with my scallop shears...


I stacked the print and the blue solid, and basted the shapes onto the skirt with a machine basting stitch.  Next was outlining the shape with yellow embroidery thread, using my machine's blanket stitch (it could have been any stitch) to give the flop some shape.


Next was the fun part..  making the toe sling (or whatever you call the part that goes between the toes).


I have an assortment of trims I picked up at a sale..with the g-baby girls in mind, and one was blue sequins.  Normally I "save" this for some undetermined occasion and never use it... hence my stash!  This time I brought out the 'bling'.  I could have just stitched it down, but being playful with it paid off.


This is the length of trim I was working with.
I centered the trim across the foot, where I thought the toe-piece should go.

I used the button stitch on my machine (a zig-zag stitch set a zero length works too) and
 placed a straight pin over the top of my presser foot to sort of create
a 'shank' where the toe piece would be.


Here is a closer view of what I mean.


another view


After that, I removed the basting stitch and added another row of blanket stitches (this time in blue) to give the flip-flop
a little more ump and secure the outside ends of the sequin trim.


I AM seriously considering adding another ruffle to the bottom of this skirt.  I'm out of the cute yellow and blue fabric, I may have enough of the blue for another ruffle for the bottom... maybe I'll add some more bling... (or should I save the trim for something else???)  heh heh


UPDATE:  I did.. I did add another ruffle in co-coordinating fabric.


Sunday, April 8, 2012

Completing projects...


Made a new top (reversible) for my g-baby in Florida...
this time I added the pocket in front
This weekend was a sew holiday for me... and I got to complete some projects and plan on more to come.


I also got my order in the mail for Rowan "Water" from Kaffee Fassett Collective.  Oh such gorgeous fabrics... and FAT quarters!  Opening this package had the same affect on me as chocolate.. (and you KNOW that's saying something!).


I also found several items put in safe places, and some right where they were supposed to be.  So the organization efforts are moving forward slowly.


While looking in my grandmother's button box, I realized I have some really cool old items.  So, soon I'll take them out and snap some shots.  Some of the buttons still on cards will be fun to share.  Other buttons were picked out like screws at a hardware store and put in a small envelope with the price written on the outside...  I won't say anymore until I have some pics to share.


Hope your weekend was everything you wanted it to be!  


Here's what I did this weekend...
sneak peek at some of my vintage buttons on cards... 10 cents!


Figured out my buttonhole functions on my Pfaff.
I read my owner's manual on the bus this week!  lol

measuring for the buttonholes to match 


only scary thing about this, is that my g-baby is so far
away, and I can't have her try it on to see if it fits
(especially for button placement)
~and especially the hugs I'm missing!


I figured out how to make the top reversible.  I plan to make more
green gingham pieces to go with it.  This is the back.


Back of the top in blue^


Back of the top in the floral^
I know I've posted pics of this outfit before, but
I finally got the buttonholes right.. and can
show you the 'reversible' aspect :D


Update:  You know when you make something (at least I do) that you press and sew and press and sew and press again, with starch even!  Alas, my daughter most likely doesn't own an iron... LOL, so keep that in mind as I post these pics my daughter took of my grandbaby/model today.


my handsome grandson who is an awesome big brother


Saturday, March 31, 2012

BOM April Block(s)

Our instructor, Amy and Craftsy.com took pity on us BOM-ers and let us start on Friday, a few days early for April's block of the month!  This month is English Paper Piecing, specifically hexagons.  And I've been fooling around with it all day. 


This is how my block turned out   
The first block Amy called a "stripe".  We are doing two rows of hexagon pieces on a 12 1/2" block.  


At my house I enlist the opinions of my 23-year old twin sons.  It's kind of amazing what they come up with.  For instance, Amy's 'stripe' is parallel to the sides of the fabric, and a bit off center to the right.  My sons not only helped me with the color arrangement of my batik prints, but decided my stripe looked better a bit wonky.  And so it is.  And I have to admit, it looks pretty good!  Thanks guys!


The second block was Amy's own design, if I'm not mistaken, and she called it "Sunny with a chance of Hex" (racy huh?)    Well she took into consideration that not everyone's quilt themes (ie holidays) would work well with this block, so she gave us a challenge to come up with our own block using hexagons.  


Here's the first block, almost all batiks, because my jelly-rolls weren't wide enough to make hexagons with.  Still.. I like it.  And I tried out my blanket stitch (no more hand stitching please) with some hot pink embroidery thread.  And my son picked out the color of the thread we thought would go the best with the block.  Sure helps that my creative/artistic gene somehow got magnified in my kids.  :D   


Here are some other shots of the hexagons, for fun, and to practice being 'artsy' with my camera.  I think there should be photography classes offered on sights like Craftsy... we need to be expert photographers as much as accomplished 'sew-artists' and quilters!


I've been reading my sewing machine and serger manuals on the way to work (I ride the bus...so no worries!) in my attempt to make friends, very GOOD friends with my sewing machines.  Using the blanket stitch on my machine for the hexagon stripe was fun.  Now if I could just get my buttonholes down! 


(click to enlarge)

As far as being creative with the second block.... we have a plan!  I haven't started cutting and making the hexagons yet, [oh and I tell you...  time to get a new prescription for the glasses!!  It wasn't easy hand stitching this time.  I had my reader's on, and I have my Ott light with the attached magnifying glass ~ I'm sure you've seen them... it looks like a Spiderman villain of the octopus variety! ha  Still not easy...  Although the lighting was terrific!]  but I will tell you it involves moonlight, instead of the sun... and a few fun extras!  I'm really excited about this block... so look for it soon!  :D


Day 2:


When my son woke up this morning he almost immediately asked if we were going to get started on the second block for April.  Is that strange or what?  Not really.  The twins and I were brainstorming yesterday and were really having fun.


So I started cutting the smaller templates and making hexy's actually in all three sizes.  Two were for the "moon" (instead of the sun).   We put the 1-1/2"  hexy on top of the 2"  snuggled in the corner to form the crescent moon ~hexy style.  And I had this cute Japanese lantern fabric that I wanted to scatter around the block.  Originally we were going to hang the lanterns across the lawn of 'grass" (which was a green strip on the bottom of the block).  That changed.  I have some "wave" fabric (same as I used in my What's in the Bag? tote).  


And suddenly we were working with waves, and then a hexy scrap from the first block looked like a boat... and then we were reminded of the lantern scene in Disney's version of the story of Rapunzel, "Tangled".   Cute movie btw.  And we were totally changing things up as the day went on.  


I was working with a black background, and was fine with it, but my son thought it needed something.  But none of the fabrics we could use would have added anything with the lanterns being the focus.  So I got out my different colors of embroidery thread and did a kind of "Starry Night" thing to fill that void.  Obviously I didn't fill the block with swirly thread like Van Gogh did with his masterpiece (wait! Van Gogh used thread?  ...no of course not, you know what I meant), but my son recognized what I was going for.  :D  Anyway... here's what we ended up with.  The creative process was a lot of fun (and second-guessing).  If I wasn't working with hexy's in this block I would totally have many many more lanterns and cut to the shape of the lanterns... there is such a variety of shapes and colors.  But hexy's it is.  I can always do another version.  :D


I totally need to have my camera serviced.  And maybe take along the manual to read on my way to work!  My pictures are not looking as good as they used to, and they are not doing the block justice.  Soon I hope.  

More artsy shots...


Wednesday, March 28, 2012

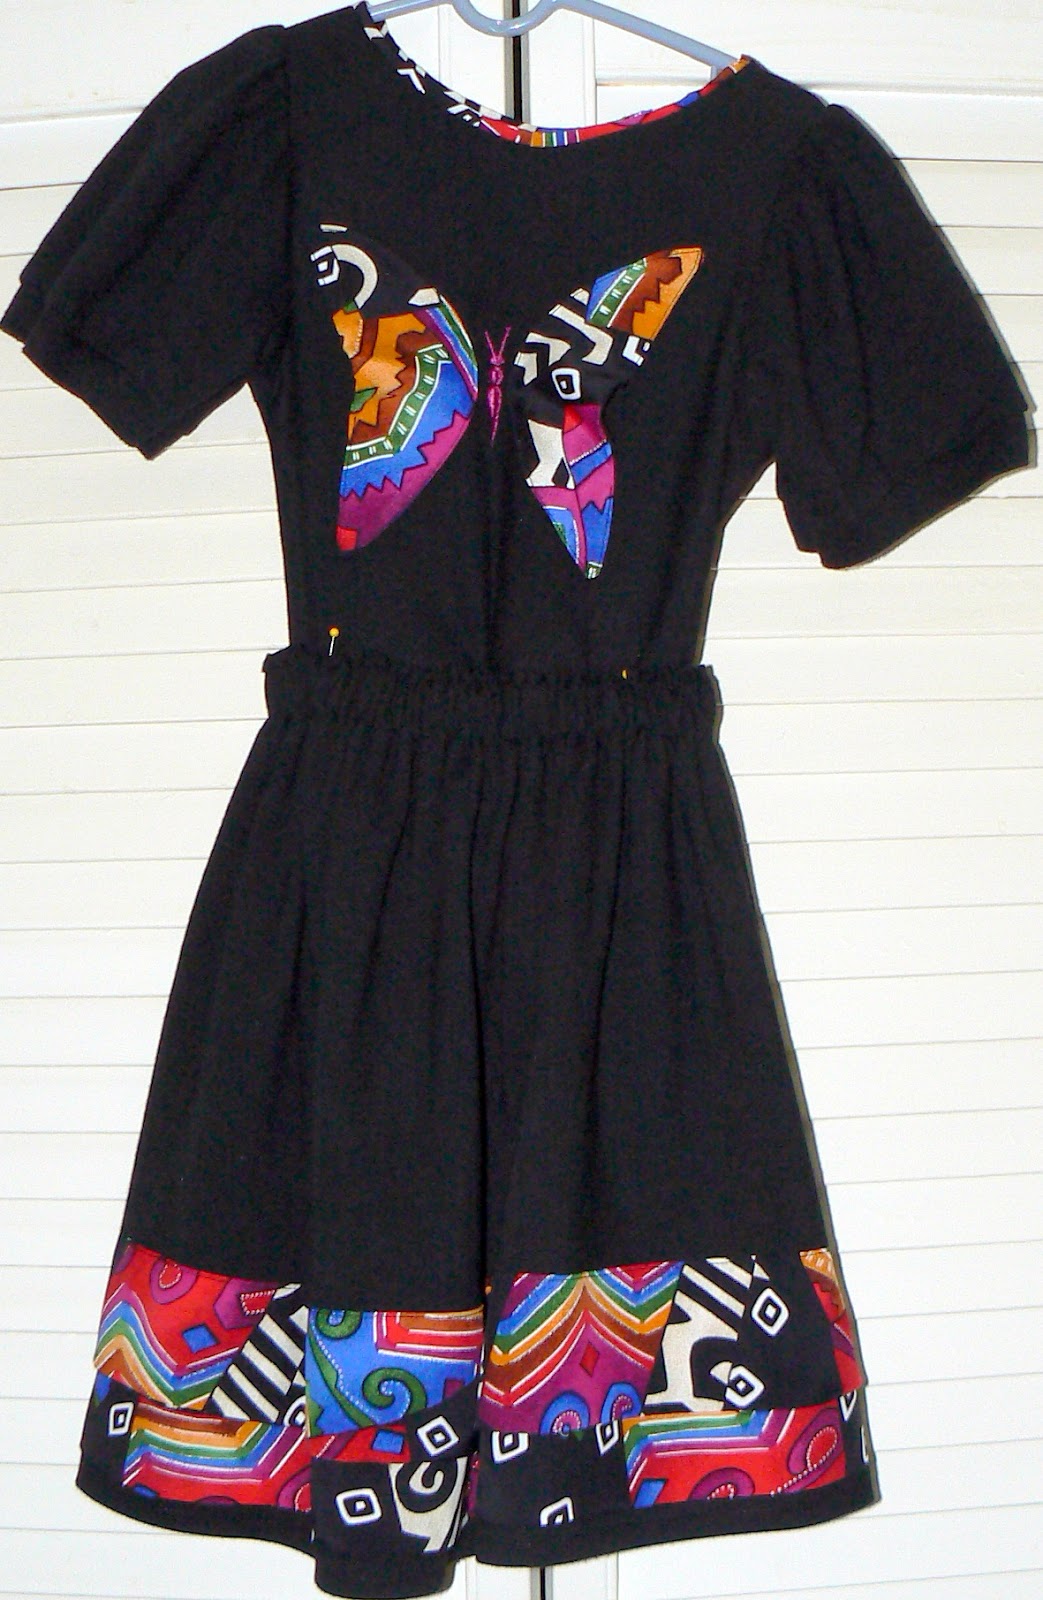
Recycled, Re-purposed, Men's Polo into Adorable Twirly Skirt & Butterfly Top

My daughter requested I get busy and give her this outfit I created a few months ago for my granddaughter.  ...Have I mentioned what a procrastinator I am?

I thought I'd show you what I made with my son's work polo's. The polo's were fabulous, in great shape, but had his former job's logo on it.   And he didn't want to wear them anymore.... so I took two of them (one for the top and one for the skirt) and made this outfit:


This is the top and skirt together.  I don't have tutorial pics (sorry~I wasn't thinking of blogging when I made this) But I can try to tell you how I did it.

The skirt was made by cutting the polo just underneath the armpits and across the body of the shirt.  ~Rotary cutter and ruler work well here.  I had to keep in mind where the logo was on the back of the polo, you might too if you are recycling.  So basically I had two finished side seams, a finished polo hem and one raw edge to work with.  All you'd really need to do is sew a casing at the top and insert elastic and you would have a finished skirt.  VERY easy!  But I wanted to add something since it was all black, and this was for my 3yo granddaughter.


I went through my stash and found this wild print.  (Don't ask me what I had in mind to make when I bought it, I don't even remember!)  But I did think it would brighten up the skirt and be fun for my granddaughter.  I intended to make ruffles.  But gathering this length of fabric seemed like too much trouble at the time, so I cut two strips 6" wide and long enough to go all the way around the skirt.   For each strip I folded them long-ways right sides together, stitching 1/4" away from the raw edges forming a tube.  I turned the tube right side out and pressed.  These strips became the fabric faux ruffles at the bottom of the skirt.  The bottom strip was placed so about an inch of the black hem showed below it, and then I sewed the upper strip/faux ruffle so there was maybe a 2 inch overlap but you could still tell there were two pieces. The  finished hem  of the polo shirt became the finished hem of the skirt.


I made the elastic casing by folding over and pressing 1 1/2-2 inches of the top edge of the skirt. *I want to share this trick for making tight casings:  I top-stitched 1/4 inch from the pressed fold all the way around the skirt.  Then I took my length of 1" wide elastic (safety-pinned together), and laid it flat against the stitching inside the casing.  I changed my presser foot to the zipper foot, laid the casing over the elastic, and sewed the casing closed with the zipper foot as snug against the lower edge of the elastic as I could (without stitching through the elastic).  You will have to manipulate the elastic as you progress around the skirt.  It helps if you keep track of where the safety pin is, so you don't enclose it in the casing.  If you aren't sure about the waistline measurement, you can still leave a two-inch opening in the casing to be able to adjust the fit if necessary, before you overlap the ends of the elastic and zigzag them together.  Remove the safety pin and   complete the top-stitching to close the casing.   I like this method because it keeps your stitching straight, you know you have enough room for the elastic, and it gives a nice professional looking finish.

(click to enlarge)

Now for the Top!


(click to enlarge)
I have a tank top pattern out of t-shirt fabric that fits my granddaughter. (I didn't make anything out of it because there was a spot on the fabric... so I use it for a top pattern~ I used the same top pattern when I cut out the Sparkly T with the matching leggings).  I cut 2 of the tank pattern pieces out of a second polo shirt, to make the front and back of the top.  I sewed those right sides together at the shoulder seams.   I then cut the sleeves from the polo shirt.  I was going to size them down, but I thought 'what a waste!' ... So I gathered the sleeves to fit the armseye of the tank.  I even used the band on the bottom of the sleeve to keep that ready-made look.  I sewed the side seams from the underside of the sleeves around the armpit area and down the side seams. It made nice puffy sleeves!  Then I hemmed the bottom of the shirt by folding and pressing the hem and sewing it with twin needles, encasing the raw edge with the zig-zag stitch that forms on the underside of the stitch, (a double row of stitching works well too, to keep that polo finish look)   


(click to enlarge)
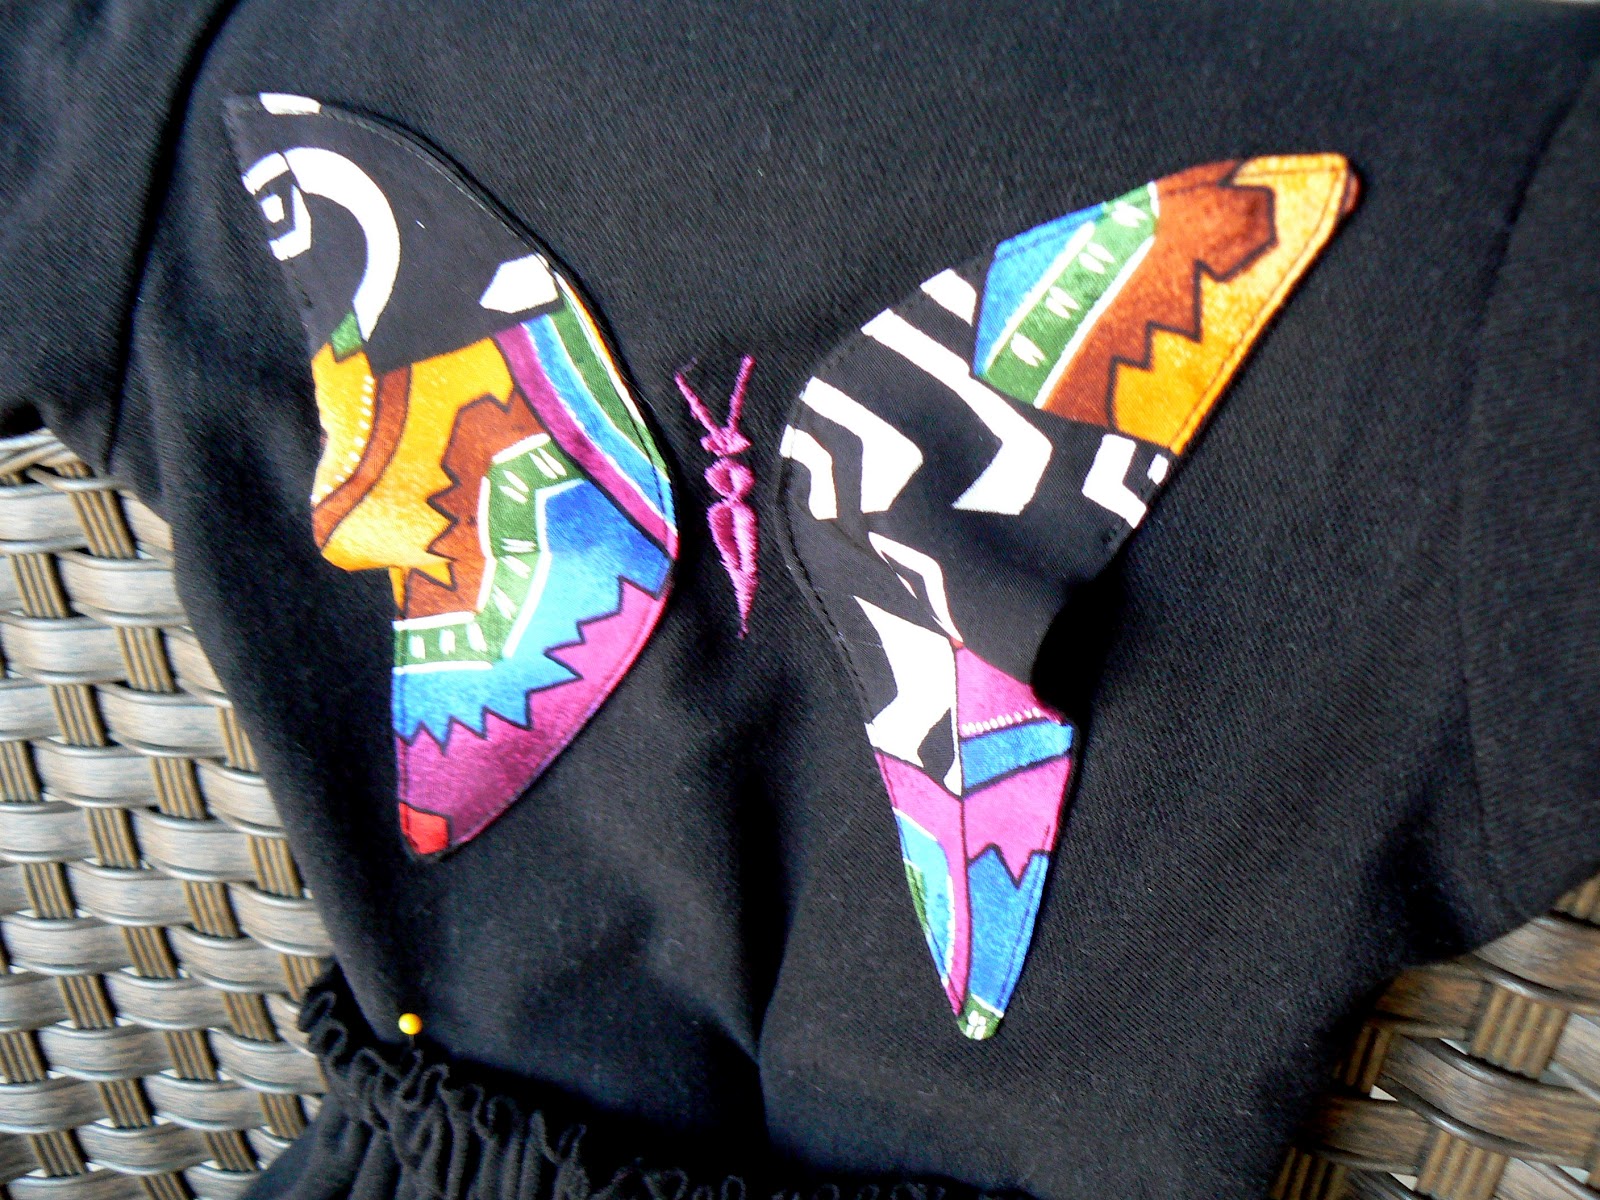
Now for the Butterfly...  This was a happy bit of inspiration.  I had scraps of this fabric on my cutting table.  Somehow I ended up with two half-circles.  The fabric is light and kind of 'floaty' and when scrunched a bit the half circles reminded me of wings... butterfly wings, so I went with it.  I cut a backing of the black T fabric the same size, sewed them right sides together ~leaving a 2 inch opening for turning, and turned the fabric right sides out again, pressed it and top-stitched close to the edge, stitching the opening closed in the process.   I had two half-moons.  I played with the placement before I realized if I sewed down the round sides facing the middle they became the wings, and if I left part of the half circle unattached to the front of the shirt they had a bit of movement to them.  Just what I wanted!  [If you notice the half-moons don't look like half-moons because I placed the top and bottom corners so that the strait sides 'buckled' or opened up a bit to give that flutter affect.


My machine has some embroidery stitches, not like my sister's super-duper model, but I experimented on my scraps and came up with a butterfly body that looked OK.  I used a dryer sheet for the backing on the inside of the shirt (which tears away easily when you're done) and I had a decent looking modern-art monarch!  hehe   This was really exciting.  I love it when a plan comes together.  [If you use your machine embroidery stitches I recommend practicing on scraps until you are confident you will get it right on the top!  Picking out embroidery stitches is NO fun!] 


(click to enlarge)
The only part I wasn't really happy with was the neckline.  I finished it with the woven fabric, for another bit of color, but I probably should have stuck with t-shirt fabric, or a much larger neck opening, or even tried to use the knit collar from my son's polo... (the woven fabric didn't allow the neckline to stretch, and we couldn't get the top over my g-baby's head!)  So that's why she's not wearing it yet, and what I need to work on next so she can wear it.  My daughter loves it, and keeps bugging me about finishing it.  So I will this weekend.
  
The best part???....this outfit didn't cost a dime!


Now couldn't you imagine some bright colored polo's, striped even, or tie-dyed shirts ready to be recycled into cute skirts/tops with accents in sweet spring/summer prints?  


Speaking of tie-dye... buy some extra egg-dying kits (after easter sales) for a tie-dye project.  It works really well!  My youngest daughter (now a mother herself) did a tie-dye project in pre-school with easter egg dyes on T-shirts. Too much fun!


And here it is being modeled by my beautiful and precocious granddaughter... 
I asked her mom what happened to the top, and she said Lele was playing with chalk when she said "OK Lele, ready to take a picture?" and Lele put down the chalk, wiped her hands off on her shirt, and said "Ready Mommy".  This kid cracks me up!  I (heart) her so much!


Sunday, March 25, 2012

Market Skirts... just the cutest little things

Hi!  The weather has been holding up nicely in the Mile High City.   Alas!  I have no off-spring's art to share (yet) but I did accomplish some sewing this weekend.  And all-in-all it was very satisfying.

I don't see people struggling with their machines on their blogs, but maybe that's because they've become properly acquainted and are good friends with theirs.  Haha!   In the past my old reliable's, my Pfaff 1471 (circa 1989) and my Pfaff Hobbylock and I were very good friends.  Unfortunately I had to replace my serger because the pedal stopped working, and the pedal cost about as much as a serger...  So I found a deal on ebay a few years ago and upgraded both my sewing machine and serger.  My 1471 is still reliable, and I may have to bring her out for buttonhole duty, because the "new" Pfaff probably needs a tuneup and the buttonholes were a fail.  Don't get me started on threading my serger!  Now that I finally found a threading instruction guide (with clear diagrams) online, I think I'm set.   I'd like to love my machines and all they can do.  If I keep putting the hours on them I have been, it won't be long!  :D  

I decided to make up some "market skirts" I pinned on Pinterest, with a great tutorial.  You may recognize the fabric... because I have been using it in my BOM.   I'm sorry I didn't take pictures of the process, but the tutorial is very clear, and includes some very helpful tips (for those of us who are a bit rusty).  

Market Skirt #1
There are a lot of good things about this skirt.  
  1. *It's simple.  
  2. *It's a free pattern (or pattern-free)... the best kind to my way of thinking!  
  3. *It can grow!  As your child (or in my case.. granddaughters) grows you can make new ones based on their waist size and length needs .. I love that!  Some of my stash is from when my daughter's were little and I had every intention of making all three of them outfits.  Now my 3yo granddaughters are two different sizes already!  This little skirt can be adjusted up into their 'tweens'.  
  4. *It's a great stash buster... not that it uses a lot of fabric... 
  5. *You will go crazy with the possibilities for changing up the look.  Trims and pockets, etc.


Which brings me to Market Skirt #2

Adult ADD must have set in... I cut the blue fabric 15"x7" and 15"x8"... OY!  Undaunted, and keeping in mind that necessity is the mother of invention, I got this wise idea to make a bunch of HST's (half square triangles ~ for those of us who are abbreviation-adverse!) to put back the length I lost.  My artist son and I had fun experimenting with the patterns we could make for a good long time... and finally settled on just one row.  Before I inserted them I covered the backs of the HST strip with some white fabric and serged the skirt fabric, the HST's and the white fabric together.  My camera is charging, or I'd run take a photo to add (will add later so you know what I'm talking about).  And  the rest was done pretty much following the tutorial directions.  Cute huh?  A bit of A.D.D./O.C.D.  genius if I do say so myself!  

(click on picture to enlarge)
(click on picture to enlarge) 

Once the skirt was finished I figured a top was in order.  I picked out this summery little number (McCall's M4762) and used both fabrics... the buttonholes didn't work out so well, so I'm going to be tweaking the closures, but I'm aiming for a reversible top.   (If you notice, in the pic above you can see the matching blue fabric on the inside of the top). 

Anyway... I'm thrilled that I'm completing clothes in the actual season and for the person they were meant for!  :D


added another ruffle for length