Tuesday, February 20, 2024

New Life for Orphan Quilt Block


I was going over the comments on our BOM class and came across the term "orphan block".  I had never heard that term before, but I knew immediately what it meant. 

I have been wanting to make some eco-friendly projects and orphan blocks provided just the opportunity!

The Block of the Month this month was a String Block. I didn't quite follow thedirections and my 1/4 blocks finished up too small to make the required 12-1/2" block. So I had four little orphans to re-purpose...actually 8 little orphans because I cut each in half down the middle and made two triangles. 

I've been eyeing those coffee cup guards for a while, thinking I could make reusable ones (and save the planet from all those cardboard sleeves! haha).  

I kept the cup from my lunch-time Chai [at the Denver Public Library's "Coffee Mug"  Coffee Shop ~not so shameless plug... the girls *my age* in the coffee shop are wonderful, the Chai is to die for] and set out to reinvent the cup sleeve!   

The ones that come with these cups are actually cool because they are degradable (after who knows how many years).. and foamy, but not quite wide or long enough for all my fingers to fit on it.  So I took the sleeve off the cup and made a pattern from it, making it longer up & down on the cup.  I also added a little extra on the sides (1/2" on each side) for overlap and hook & loop tape to fasten it closed.


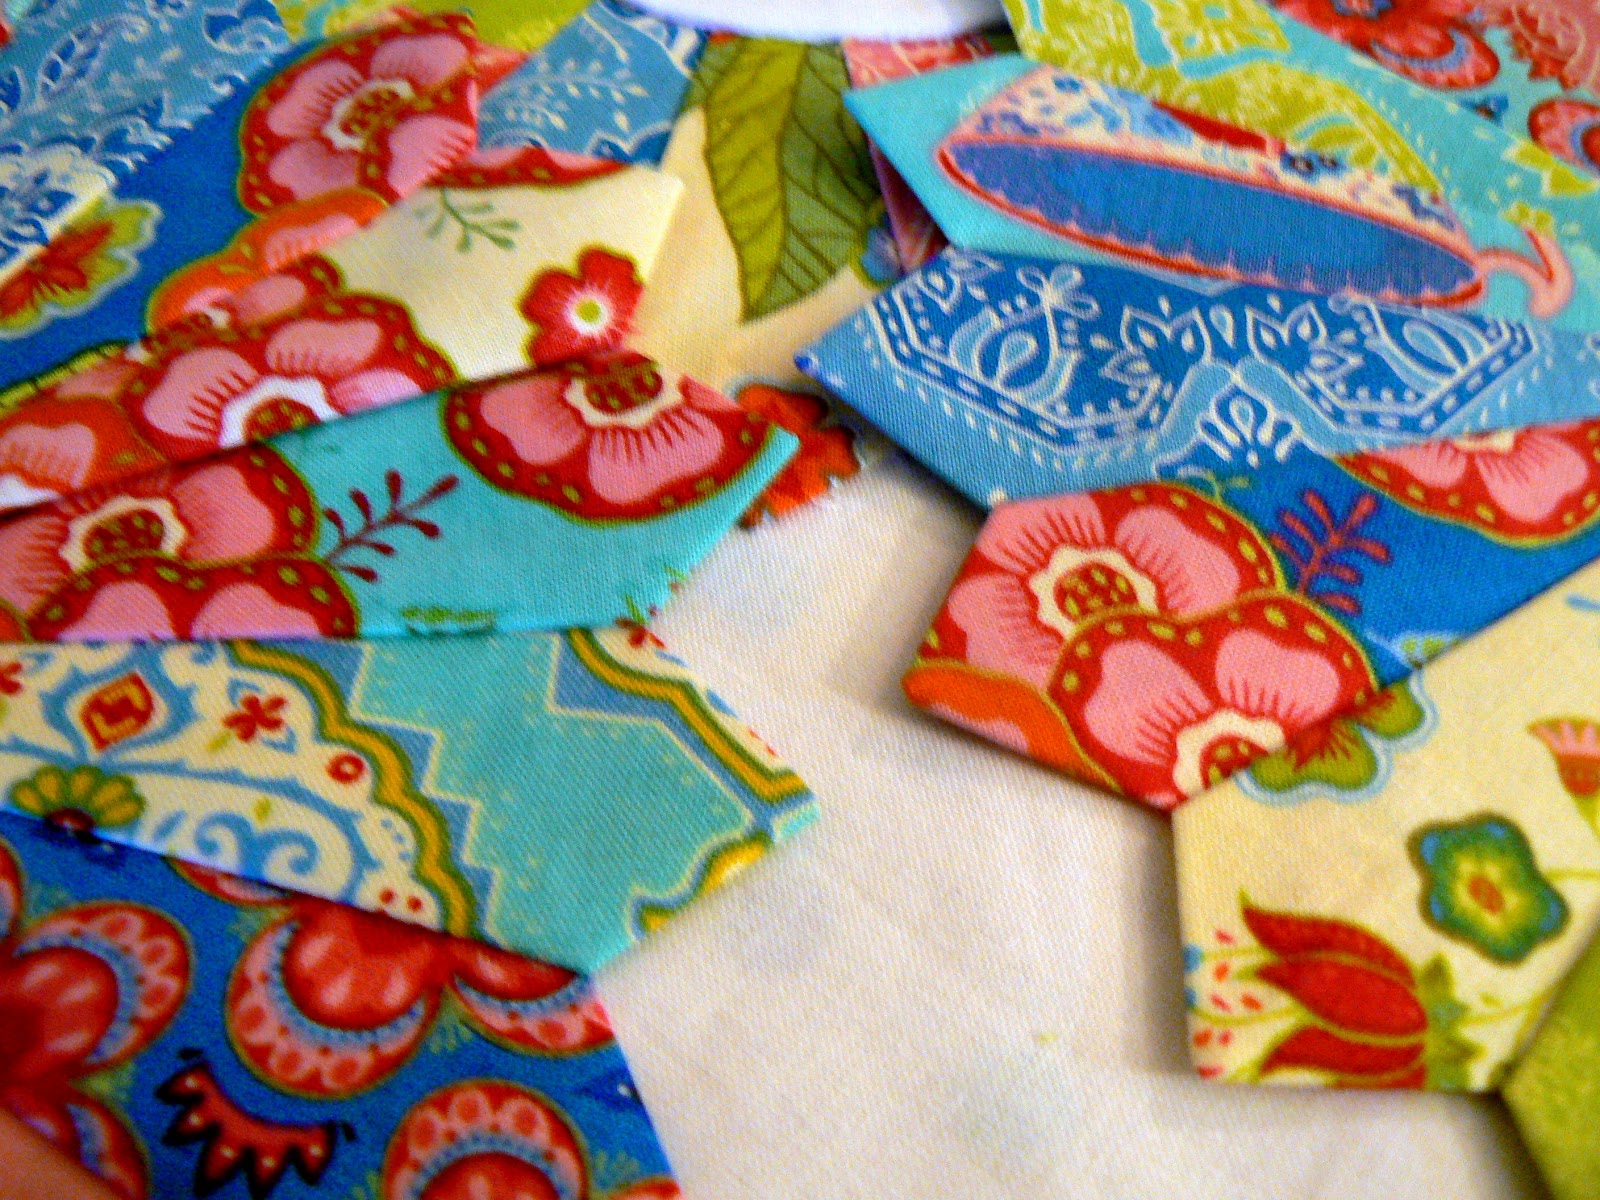
I took one of my orphan block triangles (see 1st photo above) and centered it on a black piece of fabric same size as my pattern. I did some more string piecing on each side of my orphan quilt piece to fill out my pattern  [with string piecing you end up with strips of fabric hanging off the sides that you have to trim away]  So now I have the top pieced.  


I didn't have fusible fleece on hand for padding, so I used one of my dollar store shammy's [you've seen them...bright yellow thin spongy cleaning cloths ~works great!] and cut two the same size as the top, and sandwiched the shammy pieces between the top and another piece of black fabric cut larger than the top by maybe 3/4"-1" all around.  This let me fold over the back to the front to finish the edges and give me that nice black binding.  


I centered the top and shammy pieces on the bottom piece.  I pinned it once or twice in the middle.  The black backing excess was brought over to the front.  I gave it a press at this stage (actually I press a lot through the whole process) and folded the backing so I had a nice even binding. I used my edge foot (I think that's what it's called) to stitch it down around all sides to insure  nice even stitching along the band.  I experimented with my decorative stitches to add a bit of interest.

It will eventually have a hook & loop closure... when I can locate my roll of  hook & loop tape I've had for years. Which may morph into my version of a sewing organization blog ~ please don't hold your breath!   

I'm also toying with the idea of having a strap to match with hook & loop tape that will fasten on both sides of the sleeve closure so it can negotiate through the handle of my favorite coffee mug.


I  think it turned out pretty neat.  New life for an orphan quilt block!! :D
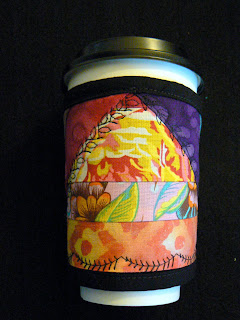


And why stop at one???


~*~

Quiltpiphany!

Quiltpiphany...you may ask? My coinage...Quilt + epiphany, but simply based on the definition of epiphanya sudden, intuitive perception of or insight into the reality or essential meaning of something, usually initiated by some simple, homely, or commonplace occurrence or experience.

My original intention of joining the B.O.M. (Block of the Month) class on Craftsy.com was two-fold. One was to fulfill my resolution to feed my need to be creative, while really learning to quilt. The other was to make a quilt for my mother... this woman is amazing. And I think "super-amazing" qualifies since she's 85 and does more than I do nearly every day! She was a DIY Diva before it was cool... inspired me to sew when I watched her sew (and lifted up the presser-foot lever for her. She's self-taught in so many areas, and nothing seems to phase her!
I have been pouring over blogs,  googling quilt patterns, looking at books, and reviewing my Pinterest pins... and finally I've decided the Dresden IS the quilt I want to make for my mother! Because as much as I love how my B.O.M. quilt is turning out, my sister and I agree that black is probably not the background color for our mom. Mom mentioned she liked pastels, particularly pink, and she happens to have the most incredible baby blue eyes... so pastels she will get with her Dresden plate quilt.  And that is my Quiltpiphany.


I used a blind hem stitch on the blades
thinking it would be stronger, and last through
machine washing better


The blades on this block are hand stitched which I really enjoyed.


And now that I know how to make a Dresden plate block (thank you very much Amy Gibson) I can do this! What a sense of relief and urgency at the same time!!! I have a beautiful jelly roll of Tea Cakes by Verna Mosquera. I bought it on sale a while ago on Craftsy.com. The colors are perfect.. and it will be fun to get started. I may even do some hand stitching on these blocks... the more I look at Amy's prize Dresden quilt the more I want mom's quilt to be look old fashioned and authentic. I'll have to decide how I'm going to stitch down those blades later. But now I'm thrilled I can get started on this. Maybe even have the top done before I go back home for my class reunion in September. I may even attempt a border similar to the one in Amy's post ~ I think I can figure it out. And for the backing... there may be one more plate with a really flowery print... but I think for sure there will be a heart, so when she pulls up the quilt around her, the heart on the quilt will be close to her own.
~*~
I also have Amy Butler fat quarters... I'm thinking I might either attempt one of her quilt patterns, or the Summer Porch Quilt by Eleanor Burns with Amy Butler prints... THAT would be a happy quilt! And hopefully mine!
This isn't my quilt... but it IS what I imagine my
Amy Butler fabric/Eleanor Burns Summer Porch
 conglomeration could aspire to be!

I bought the book just for the Summer Porch quilt pattern... and SCORE! I can also do a stained glass quilt with this pattern~just substituting black for the white lattice, so I'm psyched about that! I've also fallen in love with the easy method of half square triangles that we learned in the B.O.M. so I'd like to do something with that... maybe just go crazy making HST's and then put the pattern together, like a puzzle, on my floor, with my assistants... (the twins) and see what we come up with.

I could be a multi-quilt project person before long, and I haven't made one start to finish yet! (Except about 20 years ago I made a log cabin quilt with the QIAD book... but somehow turning the quilt like a pillow with high-loft batting inside doesn't seem quite legit to me... sorry Eleanor).

Oh boy! I'm set! Hope your weekend brings you a quiltpiphany!

Half-Square Triangle Sewing Basket

I decided I needed to see my dining table ~as a dining table!  It's covered in sewing paraphernalia, and I watched myself struggle to find my scissors, or seam ripper, or little 4-1/2" ruler... Maybe you know of what I speak.  Anyway, as I was cleaning, a brainstorm hit (or maybe it was just ADHD!) It started like this...


Left over half-square triangles... that I really like, and I've loved baskets since forever. not sure where the black ribbon came from??
Ohh... I should really use those HST's for something.  I really like them!  Oh what if I lined the basket with them and kept my sewing stuff in it??  Oh that would be cool.  [All my sewing stuff is out on my dining table and the ironing board is still up... actually the iron is hot and ready!]   
So I blew off cleaning up my mess for a while longer while I listened to the little horned guy on my shoulder.. and got busy with my new creation.

I made enough of the HST's with black as one side, then pink & white homespun type plaid, or my b/w gingham with the flowers on it on the other side, and made a zig-zag pattern that went all around the inside of the basket.

I did it the easy way... two 5-1/2 inch squares of fabric sewn right sides together around the OUTSIDE edges of the fabric; and then I cut those pieces from corner to corner (X) so I ended up with four HST's...  I really love this method.  So quick and easy.

I figured I would make a bottom piece to match, and put some toweling or something underneath to make it a bit softer...  


And then it happened... another brainstorm hit.  (Actually I love when this happens..)  I have two black (can you believe it?) dish cloths, brand new... well never been used anyway, from the dollar store... so I 'spent' 50 cents.  


If you peek on the sides of the basket (above) you can see the construction.
I centered the folds and pinned to follow the curve of the basket, and smoothed it out a bit by using the appropriate sized dish (put upside down on the fabric corners) for my rotary cutter to follow.  My dish cloths had a mesh backing, so I could either peel it off and not use it, or leave it on the dish cloth and use it.  I left it, [it was a bit stiff, and helped the dish cloth keep it's shape--like interfacing would].  I stitched around the edge of the mesh to hold it in place, since I just cut away the serged edges that were holding it in place.  I quartered my HST strip and pinned it to the dish cloth, and stitched a 1/4" seam so that it would work with my 'quilt pieces'.   

I had a few ideas for making pockets for the outside of the basket, and making the basket liner reversible,  but 'simple is better' won out.  I finished the edges with strips of black fabric (people must think everything in my house is black!  lol) added a piece of ribbon on all four quarters to tie it in place.  I love it.


Now I'll be able to find my tools in style  :D
I guess it's back to finding the dining room table again!  Wish me luck!


BOM to date...August 2012


I know my collage is titled "June" but it's really all the blocks I've done up to this point (August 2012).  And I'd probably arrange the blocks a few 100 times before posting, but it's not that easy on Picasa... and that's what I use.  However, that being said, I think my BOM quilt is shaping up nicely!  

Some Fabrics just make me Smile!

I am so excited about working on this quilt for my mom, and that excitement just ramped up a few notches when I opened up my new jelly roll of Tradewinds by Lily Ashbury fabric that I talked about on my last post.  I've already made 10 blocks and ran out of fabric.  So I picked up more fabric, not exactly the same kind, but similar colors.  But when I opened the new jelly roll..... OMG!

This fabric is so luscious and yummy it makes me long for a bowl of tropical fruit!  See what I mean?

Before I opened the jelly roll ^


I see that wonderful 'mango' color... and my mouth waters.. really!
This is such a joy to work with this fabric!


Even my scraps are happy!  
I saw a very cute paper-pieced umbrella on flicker somewhere...
 I think these scraps could make a very cheery umbrella! or ten!  :D


I sewed the wedges 2x2 in the order I wanted them on the 'plate'. 
It worked much better than when I sewed all of one print and sorted out the order after the fact.
Another view of the wedges joined together on my ironing board.  I also clipped the folded edge on all of them for easy turning.

One tip I can share... (and I don't have a picture that demonstrates that yet) when I sewed the blades (with the points) together I started sewing about 1/4 inch down from the top and backstitched to the top, and then continued down to the end of the blade.  Doing it this way the threads are 1/4 inch from the top which hides the start position and the thread ends, and makes the points that much prettier and cleaner.  I learned this after making ten blocks (200 blades!)... so I know of what I speak.... and like my Dad always said, "when all else fails, read the directions!"
The directions were right on the cardboard the wedge template came with!


This is the first plate in the new fabric.  
The wedges are machine stitched together, but I hand sewed the plate
on the background fabric, and then hand-stitched the center as well.  
This fabric is easy to hand stitch too!


The purple & yellow thingy is a seam ripper) I used to keep my place on the circle of fabrics. This is next to my sewing machine. I'm just going around the circle stitching the tops of the wedges. I alternated the "pow" fabrics with the 'duller' ones ~ none of these prints are boring! And I put them next to fabrics that had at least one common color.  I'm liking the results.
P.S. some of these wedges even have the wrong side showing.


Just had to share my 'happy fabric'  :D

Saturday, February 17, 2024

Retro Halter Top

I found some old patterns of mine...  circa late 60's early 70's.  Particularly a halter top I made and wore a lot!  If I find a picture of me wearing it, I'll scan it and post it.  It was one of my favs.


Here's the pattern:  Look $1.50!  (and a 31 1/2" bust??)   


I decided to use my new pack of Rowan "Water" from Kaffee Fassett Collective fat quarters to make one up for my daughter, who turns 30 at the end of this month (but can still rock the halter top).  Happy Birthday Raine!


I made this top reversible (similar to the top I made for my granddaughter ~with the same green gingham fabric) and I STILL have 3 yards of gingham left...  
I used to make gingham napkins for the barbecue restaurant up the street (many moons ago) and I'm pretty sure this gingham is left over from then.  I just may make a set of napkins and who knows what else out of the rest.  But I like the gingham as a facing on this top, the greens compliment each other well.


It was fun was going down memory lane... my early days at sewing (and lets face it... when I could still rock a halter top!) and trying to remember what my sewing experiences were like back then.  I have to admit, using a 5/8" seam allowance seems a bit strange after sewing so many scant 1/4" seams while quilting.  

I still remember the fabric... a beautiful red woven print with lots of accent colors.  I made a peasant mini dress out of the same fabric too.  

But I don't much remember what I used to turn the ties right side out back then (maybe a safety pin?).  I do know my sewing techniques have come a long way since then.


And while the gingham is old school... and classic; the Rowan "Water" from Kaffee Fassett Collective is absolutely beautiful and fresh..


 I also made a mug rug out of my Kona white and more of the Rowan "Water"  selection.  I sandwiched it with some Insul-Bright, and did some channel quilting on the squares.  And I finished it off by binding it with bias strips I cut from the left-over scraps.  This was my first attempt at quilting and binding for quite a while.  While the block isn't technically perfect, I like it.  And I hope my daughter does.. :D


Three different prints from the "Water" collection
were used for the top & the binding


Backing fabric...more from the "Water" collection


What's In the Bag?


My sister Rose has an embroidery business.  CB Designs, in Arvada, CO.  She has a beautiful machine that stitches out 10 different colors automatically, and she embroiders mainly for businesses (hats, gear, t-shirts, aprons... whatever).  But when WE get together she is all excited about the fun stuff there is to embroider and we test it out.

  
I like tree frogs.  And I'm not the only one in the family that does. So when Rose found this tree frog pattern... well we HAD to stitch it out.  The only thing she had though (since she doesn't sew) was a scrap T-shirt from one of the rejects of a print job they did.  Bright goldenrod.  The frog literally took an hour to stitch out (57,000 stitches I think), we used 14 colors.  I could not bear to let it sit on a t-shirt that would never be worn... SO I made a drawstring bag out of it.  Everything I used was already on hand.  The blue fabric was from my inventory stash.  Even the drawstring was pulled out of a pair of drawstring pants I don't wear.   I didn't use a pattern, I just made it up.  It was a bit nautical in theme since it was for my granddaughter in Florida who goes boating and plays on the beach a lot. 


And the ultimate recycling kicker is that I put an empty plastic coffee container on the inside.  The coffee can keeps the bag's shape, and keeps my granddaughter's treasures and treats clean, dry and sand-free on their frequent boating outings in Florida where they live.  Even the blue fabric is a wave print!  I love it when a plan comes together!  :D


OH! There's more!  Rose stitched out two of these frogs (two granddaughters remember?).  So the other T-shirt was recycled into a cute little skirt.  Unfortunately the frog is sideways, but hey... I can't even guess how much $$ in thread (57,000 stitches!!) there is in this frog!   Take a look:


Tree Frogs are my favorite!
Isn't she lovely?

For this simple little skirt I just cut the t-shirt across the chest, just under the arm-pits with a rotary cutter.  I folded over the raw edge to make the casing to fit the 3/4" elastic I had on hand, and I was done!  I left the hem of the t-shirt as is, and it's the hem of the skirt.  


Easy and easy care!


Earth Day and Feng Shui

My last post was about completing projects.  I'm still struggling.  One of my main objectives was to clear the clutter in my mind as well as my apartment, and neither is going terrifically.  While I have accomplished a lot, I've also turned to the internet for ideas to organize my sewing stuff/area/room.  Yay for Pinterest!  But now my mind is on information overload, and my get-to-it-tiveness is sputtering.  My dining table is a mass of fabric and sewing machines, patterns, half-done projects, and my sons are complaining about bumping into the ironing board I've left out which is in the direct path between the rest of the apartment and the kitchen.  Ugh.

I make lists during the slow times at work, where my life is uncluttered, take them home with determination, and somehow on the bus ride and the hike up the hill to my apartment it all goes out the window when I open my front door.   How will I ever accomplish this?

Earth Day is this weekend.  And since my main purpose is re*purpose (hence the blog name), I'm making the extra push to get things REALLY accomplished for Earth Day.  I looked up organizing blogs (hoping one would be particularly inspiring to get the lead out) and on http://clutterdietblog.com/ found information about Goodwill Industries. Did you know that across the country GWI saves over 2 billion pounds of waste from the landfills every year?  They recycle and list books for sale on Amazon, they recycle electronic equipment (Many people don’t realize that Dell and Goodwill have partnered in over 2600 dropoff locations across the United States to responsibly recycle computers, phones, monitors, and other electronics. You can find the nearest Reconnect donation center here.)  And they provide training and jobs for veterans, people with disabilities, language barriers, transportation problems, criminal records, or child care problems—anyone with a challenge to finding employment. 

I've just made arrangements with my daughter and son-in-law to help me load up my donations and take them to our Goodwill store this weekend.  So I'm committed!  And feeling better already.  Simple acts from all of us make hugh differences in the environment, and in people's lives.  So even if I don't personally make something cute or reuseable out of every bit of excess whatever I have around here, it will be recycled, put to good use and kept out of landfills.

Now that the big picture is clear, maybe my efforts will trickle down to my objectives in my own household, and my own re*purposing efforts!  And my apartment will return to it's cute self, so I can sew efficiently and effectively, and my place is decluttered, warm and inviting!  I can only blame the mess on the twins so long before I realise there are a few fingers left still pointing back at me!    Posting progress reports should keep me motivated too! 

Happy Earth Day Mom (Mother Earth)!  :D


Craftsy B.O.M. to date...


Arranged in the Order they were Made

Arranged with the most black background fabric in the middle row

I'm starting to wonder what this B.O.M. quilt is going to end up looking like.  And how should I arrange these blocks... ???   Here are a couple of arrangements with the 12 I've made so far (and there are still eight yet-to-be revealed blocks to go!)
Any ideas or suggestions??


I have some very talented kids... all five of them!

I have some very talented kids... all five of them!

Today I'm excited because Raelani (daughter #1) and her husband Sam, are bringing over a huge painting Raine (daughter #2) did in college.  It's a big blow-up of a Grateful Dead album cover... and it's beautiful.  I'll post pics when it gets here.  The album cover it's taken from is this one, if I'm not mistaken...


I just remember the beautiful girl on Raine's rendition.  We shall see.

And since Raelani and Sam are doing me such a big favor in letting me have it, and bringing it over... I'm going to be working on more skirts for Lele (granddaughter #1).  It's a simple skirt, and I got the idea here.  I'll be posting pics of that as well too.  Organizing will have to be put on hold for a bit!  haha

The weather is beautiful today... the patio doors are open, and it's going to be fun putting those skirts together.  Maybe I'll be blasting some old time rock and roll too!

Reuse Re-purpose = Receive adorable smiles!


My sweetie pie granddaughter & my recycled T
(click for a close-up)
Close up of the tank top
(click to enlarge)


I have a few friends who are avid thrifty shoppers.  One in particular is Debbie.  We met up at a local watering hole after work one day, and had an icy cold one while we caught up.  Afterwards, she giggled and said... lets go to the thrift store next door and get you some things!  OMG  I am not a shopper (somehow I am lacking that gene) and certainly not with a slight buzz on.

Well... I landed up with a trash bag sized bag of finds for $30.  Not to mention another trash bag of clothes Debbie had for me in her car trunk too!  Great haul.  And Debbie has great taste.  Just that some of the items were more her than me.  One in particular was this sparkly tee with twill tape down the button placket that I didn't particular like.  I was going to donate it, and took another look.  Hmmm... maybe I should try and recycle it?

So I did.  I got a tank top of my granddaughter's to use as a pattern, and I cut away at the body of the tee, utilizing as much of the sparkles (actually I think they are tiny little metal studs) and made the tee.  But there was still a bit more t-shirt fabric left and long sleeves.  Ahh!  I decided to make leggings out of them to match.  It wasn't hard, and again I borrowed a pair of leggings for a size reference.  I just put one of the legs inside the other, used that as my pattern to cut the sleeves in the shape of the legging (leaving plenty for the elastic waist band casing), sewed the crotch seam, folded and stitched the casing with the elastic inside, and I was done.  I kept the seams of the sleeves, didn't have to hem the bottoms of the leggings, and used the ready-made finishes as much as possible so I didn't have to drag my over-lock machine out and wrestle with threading it!  With my experience sewing active-wear, these were a breeze.  And viola!  Here is a recycled, re-purposed really cute outfit for my granddaughter!

This was last summer, and I didn't think to take pictures of the process.  But I may do the same thing with another T before she (or my other beautiful granddaughter) grows too big! :D


Retry on the Broken Spider Web block... Success!


I just had to post my "new and improved" Broken Spider Web block that I just finished.  My other one was fine, but I didn't place the first strips on my mark as I should have and didn't have any seam allowance on one point... which was going to drive me crazy! So back to the drawing board. I think I like this one better too! And I have figured out uses for the blocks that won't make it into the quilt for whatever reason.  I'm coming up with some ideas!  


(See my coffee cup sleeve ~ or New Life for an Orphan Quilt Block!)

August BOM blocks

I've had more difficulty getting started on these two blocks... mostly with fabric selection than any of my blocks, at least in the last few months.  Since I have a black background fabric I'm doing things basically opposite of what Amy Gibson is showing us in the Craftsy B.O.M. videos.   I wanted a feeling of continuity throughout the blocks, but I didn't start with a "collection" of fabrics to begin with. I started with my very 20-30 year old stash.  Some of my fabrics you've seen have evoked memories of projects from my girls childhoods (mom... didn't you make warm windows out of this fabric?) which has been fun, but I'm hoping what I'm creating now will create good warm memories for the future (not warm windows memories)... lol

Here is the first block. I chose a Kaffe Fasset print from his "Water" Collection for the center star; a sky blue (even tho it looks more greenish turquoise in this pic) shot cloth I've had for ages; and Anna Marie Horner prints for the outside star.  This is a block that really requires precision cutting and sewing.  I can't even imagine doing a whole quilt of these... but it would be awesome!


Block #16  Double Star

The Ohio Star was next... I normally bang both blocks out the day they release the monthly instructions & video, but this month was different, harder some how.  It could be that a lot is going on.  I've been working on my mom's quilt... Dresden Plate parts everywhere.  I also am going to start selling my coffee cozies and I'm working on the "presentation" for the counter they will be on ...Marketing... who knew?  So anyway, I put aside everything else tonight and put the Ohio Star block together.  Obviously it's a bit tamer than the Double Star with only two prints, but I really love both the fabrics.  These are also from Kaffe Fassett's "Water" Collection as well.   Gotta love me some KF (without the "C")  hehe.


Block#15 Ohio Star

If you haven't joined the B.O.M. on Craftsy... well why not?  It's free.  And this month I learned how to do the quarter square triangles with Amy Gibson's WAY helpful hints.  If you compare either of these stars to the one I made for my daughter two months ago....  well that would tell you just HOW helpful Amy's hints are.  My blue swirly triangles look like they're kissing.... they are so tight.  :D


Fancy Tiger... my new fav place to fabric shop

Four minutes from work (on the bus no less) is my new favorite fabric store.   I've heard tell about it, but meh, a store is a store... I've been disappointed lately in the be-all end all stores (mainly my sewing machine repair place... another blog perhaps).   But not this time!!  Score big time for Fancy Tiger!

I needed more fabric for my Dresden Plate quilt I'm making for my mom.  But the line I started out with wasn't readily available.  I called down to Fancy Tiger to check if they had that particular line.  They didn't either, BUT she sweetly looked up the fabric online and thought they could find something that would go with the fabric.  So, after work I scooted across the street, jumped on the Broadway bus and was there in under 5 minutes.   

I walked into this spacious store with gleaming hardwood floors and bolts and bolts of beautiful fabric everywhere.  Very easy to get lost in a place so full of yummy-ness.  But the same girl I talked to on the phone was there behind the counter ready to assist me.  We sized up the fabric situation, and I came away with a luscious jelly roll of Tradewinds by Lily Ashbury and coordinating backing fabric.  And I couldn't take my eyes off it on the long bus ride home.

And the girls were so nice!  I wish I wasn't so horrible with names.  Because I'd want to give kudos to all of them.  It's like we were all in this project together.  And they want me to bring the quilt back in when I get it made up.  The encouragement and the camaraderie is, well ...happy.

I am so gonna be back!  As soon as I stop drooling over this fabric and make up this quilt!!


Isn't it pretty!! ... just wait until I open up that jelly roll and unfurl it's deliciousness all over the place.  LOL  Mom's gonna love it!  How could she not?


Have you found your favorite quilt shop?   Fancy Tiger was such a breath of fresh air... I am going to have fun visiting that shop on the regular!