
I was going over the comments on our BOM class and came across the term "orphan block". I had never heard that term before, but I knew immediately what it meant.
I have been wanting to make some eco-friendly projects and orphan blocks provided just the opportunity!
The Block of the Month this month was a String Block. I didn't quite follow thedirections and my 1/4 blocks finished up too small to make the required 12-1/2" block. So I had four little orphans to re-purpose...actually 8 little orphans because I cut each in half down the middle and made two triangles.
I've been eyeing those coffee cup guards for a while, thinking I could make reusable ones (and save the planet from all those cardboard sleeves! haha).
I kept the cup from my lunch-time Chai [at the Denver Public Library's "Coffee Mug" Coffee Shop ~not so shameless plug... the girls *my age* in the coffee shop are wonderful, the Chai is to die for] and set out to reinvent the cup sleeve!
The ones that come with these cups are actually cool because they are degradable (after who knows how many years).. and foamy, but not quite wide or long enough for all my fingers to fit on it. So I took the sleeve off the cup and made a pattern from it, making it longer up & down on the cup. I also added a little extra on the sides (1/2" on each side) for overlap and hook & loop tape to fasten it closed.

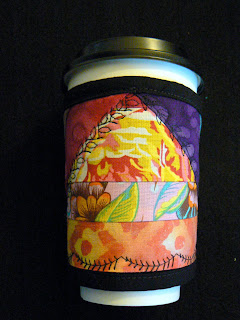
I took one of my orphan block triangles (see 1st photo above) and centered it on a black piece of fabric same size as my pattern. I did some more string piecing on each side of my orphan quilt piece to fill out my pattern [with string piecing you end up with strips of fabric hanging off the sides that you have to trim away] So now I have the top pieced.

I didn't have fusible fleece on hand for padding, so I used one of my dollar store shammy's [you've seen them...bright yellow thin spongy cleaning cloths ~works great!] and cut two the same size as the top, and sandwiched the shammy pieces between the top and another piece of black fabric cut larger than the top by maybe 3/4"-1" all around. This let me fold over the back to the front to finish the edges and give me that nice black binding.
I centered the top and shammy pieces on the bottom piece. I pinned it once or twice in the middle. The black backing excess was brought over to the front. I gave it a press at this stage (actually I press a lot through the whole process) and folded the backing so I had a nice even binding. I used my edge foot (I think that's what it's called) to stitch it down around all sides to insure nice even stitching along the band. I experimented with my decorative stitches to add a bit of interest.
It will eventually have a hook & loop closure... when I can locate my roll of
hook & loop tape I've had for years. Which may morph into my version of a sewing organization blog ~ please don't hold your breath!
I'm also toying with the idea of having a strap to match with hook & loop tape that will fasten on both sides of the sleeve closure so it can negotiate through the handle of my favorite coffee mug.

I think it turned out pretty neat. New life for an orphan quilt block!! :D
And why stop at one???


~*~
2 comments:
Just love this idear, am about to make some myself. Thank you for directions. Gerry in Oz.
Hi Gerry in Oz! Glad you like these... you're welcome for the directions and I'd love to see what you come up with. Happy holidays!
Post a Comment