Saturday, February 17, 2024

Craftsy B.O.M. to date...


Arranged in the Order they were Made

Arranged with the most black background fabric in the middle row

I'm starting to wonder what this B.O.M. quilt is going to end up looking like.  And how should I arrange these blocks... ???   Here are a couple of arrangements with the 12 I've made so far (and there are still eight yet-to-be revealed blocks to go!)
Any ideas or suggestions??


I have some very talented kids... all five of them!

I have some very talented kids... all five of them!

Today I'm excited because Raelani (daughter #1) and her husband Sam, are bringing over a huge painting Raine (daughter #2) did in college.  It's a big blow-up of a Grateful Dead album cover... and it's beautiful.  I'll post pics when it gets here.  The album cover it's taken from is this one, if I'm not mistaken...


I just remember the beautiful girl on Raine's rendition.  We shall see.

And since Raelani and Sam are doing me such a big favor in letting me have it, and bringing it over... I'm going to be working on more skirts for Lele (granddaughter #1).  It's a simple skirt, and I got the idea here.  I'll be posting pics of that as well too.  Organizing will have to be put on hold for a bit!  haha

The weather is beautiful today... the patio doors are open, and it's going to be fun putting those skirts together.  Maybe I'll be blasting some old time rock and roll too!

Reuse Re-purpose = Receive adorable smiles!


My sweetie pie granddaughter & my recycled T
(click for a close-up)
Close up of the tank top
(click to enlarge)


I have a few friends who are avid thrifty shoppers.  One in particular is Debbie.  We met up at a local watering hole after work one day, and had an icy cold one while we caught up.  Afterwards, she giggled and said... lets go to the thrift store next door and get you some things!  OMG  I am not a shopper (somehow I am lacking that gene) and certainly not with a slight buzz on.

Well... I landed up with a trash bag sized bag of finds for $30.  Not to mention another trash bag of clothes Debbie had for me in her car trunk too!  Great haul.  And Debbie has great taste.  Just that some of the items were more her than me.  One in particular was this sparkly tee with twill tape down the button placket that I didn't particular like.  I was going to donate it, and took another look.  Hmmm... maybe I should try and recycle it?

So I did.  I got a tank top of my granddaughter's to use as a pattern, and I cut away at the body of the tee, utilizing as much of the sparkles (actually I think they are tiny little metal studs) and made the tee.  But there was still a bit more t-shirt fabric left and long sleeves.  Ahh!  I decided to make leggings out of them to match.  It wasn't hard, and again I borrowed a pair of leggings for a size reference.  I just put one of the legs inside the other, used that as my pattern to cut the sleeves in the shape of the legging (leaving plenty for the elastic waist band casing), sewed the crotch seam, folded and stitched the casing with the elastic inside, and I was done.  I kept the seams of the sleeves, didn't have to hem the bottoms of the leggings, and used the ready-made finishes as much as possible so I didn't have to drag my over-lock machine out and wrestle with threading it!  With my experience sewing active-wear, these were a breeze.  And viola!  Here is a recycled, re-purposed really cute outfit for my granddaughter!

This was last summer, and I didn't think to take pictures of the process.  But I may do the same thing with another T before she (or my other beautiful granddaughter) grows too big! :D


Retry on the Broken Spider Web block... Success!


I just had to post my "new and improved" Broken Spider Web block that I just finished.  My other one was fine, but I didn't place the first strips on my mark as I should have and didn't have any seam allowance on one point... which was going to drive me crazy! So back to the drawing board. I think I like this one better too! And I have figured out uses for the blocks that won't make it into the quilt for whatever reason.  I'm coming up with some ideas!  


(See my coffee cup sleeve ~ or New Life for an Orphan Quilt Block!)

August BOM blocks

I've had more difficulty getting started on these two blocks... mostly with fabric selection than any of my blocks, at least in the last few months.  Since I have a black background fabric I'm doing things basically opposite of what Amy Gibson is showing us in the Craftsy B.O.M. videos.   I wanted a feeling of continuity throughout the blocks, but I didn't start with a "collection" of fabrics to begin with. I started with my very 20-30 year old stash.  Some of my fabrics you've seen have evoked memories of projects from my girls childhoods (mom... didn't you make warm windows out of this fabric?) which has been fun, but I'm hoping what I'm creating now will create good warm memories for the future (not warm windows memories)... lol

Here is the first block. I chose a Kaffe Fasset print from his "Water" Collection for the center star; a sky blue (even tho it looks more greenish turquoise in this pic) shot cloth I've had for ages; and Anna Marie Horner prints for the outside star.  This is a block that really requires precision cutting and sewing.  I can't even imagine doing a whole quilt of these... but it would be awesome!


Block #16  Double Star

The Ohio Star was next... I normally bang both blocks out the day they release the monthly instructions & video, but this month was different, harder some how.  It could be that a lot is going on.  I've been working on my mom's quilt... Dresden Plate parts everywhere.  I also am going to start selling my coffee cozies and I'm working on the "presentation" for the counter they will be on ...Marketing... who knew?  So anyway, I put aside everything else tonight and put the Ohio Star block together.  Obviously it's a bit tamer than the Double Star with only two prints, but I really love both the fabrics.  These are also from Kaffe Fassett's "Water" Collection as well.   Gotta love me some KF (without the "C")  hehe.


Block#15 Ohio Star

If you haven't joined the B.O.M. on Craftsy... well why not?  It's free.  And this month I learned how to do the quarter square triangles with Amy Gibson's WAY helpful hints.  If you compare either of these stars to the one I made for my daughter two months ago....  well that would tell you just HOW helpful Amy's hints are.  My blue swirly triangles look like they're kissing.... they are so tight.  :D


Fancy Tiger... my new fav place to fabric shop

Four minutes from work (on the bus no less) is my new favorite fabric store.   I've heard tell about it, but meh, a store is a store... I've been disappointed lately in the be-all end all stores (mainly my sewing machine repair place... another blog perhaps).   But not this time!!  Score big time for Fancy Tiger!

I needed more fabric for my Dresden Plate quilt I'm making for my mom.  But the line I started out with wasn't readily available.  I called down to Fancy Tiger to check if they had that particular line.  They didn't either, BUT she sweetly looked up the fabric online and thought they could find something that would go with the fabric.  So, after work I scooted across the street, jumped on the Broadway bus and was there in under 5 minutes.   

I walked into this spacious store with gleaming hardwood floors and bolts and bolts of beautiful fabric everywhere.  Very easy to get lost in a place so full of yummy-ness.  But the same girl I talked to on the phone was there behind the counter ready to assist me.  We sized up the fabric situation, and I came away with a luscious jelly roll of Tradewinds by Lily Ashbury and coordinating backing fabric.  And I couldn't take my eyes off it on the long bus ride home.

And the girls were so nice!  I wish I wasn't so horrible with names.  Because I'd want to give kudos to all of them.  It's like we were all in this project together.  And they want me to bring the quilt back in when I get it made up.  The encouragement and the camaraderie is, well ...happy.

I am so gonna be back!  As soon as I stop drooling over this fabric and make up this quilt!!


Isn't it pretty!! ... just wait until I open up that jelly roll and unfurl it's deliciousness all over the place.  LOL  Mom's gonna love it!  How could she not?


Have you found your favorite quilt shop?   Fancy Tiger was such a breath of fresh air... I am going to have fun visiting that shop on the regular!  

Saturday, June 30, 2012

July BOM ~ Dresden Plates


July BOM is the Dresden Plate... I'm just going to put up pics of my renditions, and add more info a bit later.  Happy Saturday!


Monday, June 25, 2012

Update on the Mug Rugs...

Just a quick note and update.. nearly a month since my daughter and her new hubby were here, they sent me pics of the mug rugs I gave them.  I've posted my daughter's "Mug Rug to the Stars" but Ryan's "Bow Tie Mug Rug" was completed and gifted before I took a pic... here they are


It's over 100 degrees again today...not typical Denver weather yet it's been like this since Friday and promises to continue this week... At 5PM downtown was smelling like a campfire.  Indications that the fire-fighting going on north of us may not be going so well.  It would be nice for the fire-fighters to catch a break.

Hope your weather is cooperating where you are! 


Friday, June 15, 2012

Market Skirt Pocket Tutorial


Market Skirt Pocket Tutorial


Another market skirt!  I can't seem to make enough of these little lovelies.. This time I was determined to add pockets, which has been a big 'fail' for me up until this point. Dana, from Danamadeit.com blog has great tutorials on both the skirt and a gathered pocket, but I was having trouble sewing the pocket on AFTER the skirt was together.  There are just too many gathers for me to be able to sew the pocket easily.  Or.. maybe I just need to re-read the tutorial one more time?  :D

I came up with a slightly different pocket design and and sewed the pocket on before constructing the skirt. It worked for me. Here's how the pocket came together.

Lined patch pocket


For 2 pockets I cut 2 front pieces (floral) and 2 lining pieces 6" square.  The size is arbitrary, but easy to cut with my 6 x 24 ruler.  Actually I think the original pocket was closer to 7"x6", because it ended up a tad bit wider and more gathering at the top (making it look almost circular).

The two front pieces were "fussy cut" to match.


I rounded off the bottom corners using a coffee cup my mom gave me.
(notice the caption?) 

All bottom corners are rounded.


If you wonder why I am using 1" casings... 
well, I have a LOT of 3/4" wide elastic!


For the casing I measured 1-1/2" down from the top of the pocket and marked with a pin, pinning again another 1" down.  These pins mark the openings for the casing.  You don't want to stitch between the pins for this step.

I stitched a 1/4" approximately from the pocket edge, all the way around, leaving  the 1" openings on either side for the casings. 
  
Now I have not seen this little trick on any blogs I've read so far, so this may be an old school method, and possibly new to you... 

when leaving an opening for turning, rather than back stitching, pivot and continue the stitching to the edge of the fabric/seam allowance.  

It's great for added strength, but the sweet part is, the opening is nearly invisible after turning and looks very finished.  Try this on the next item you have to turn.. like pillows, etc!


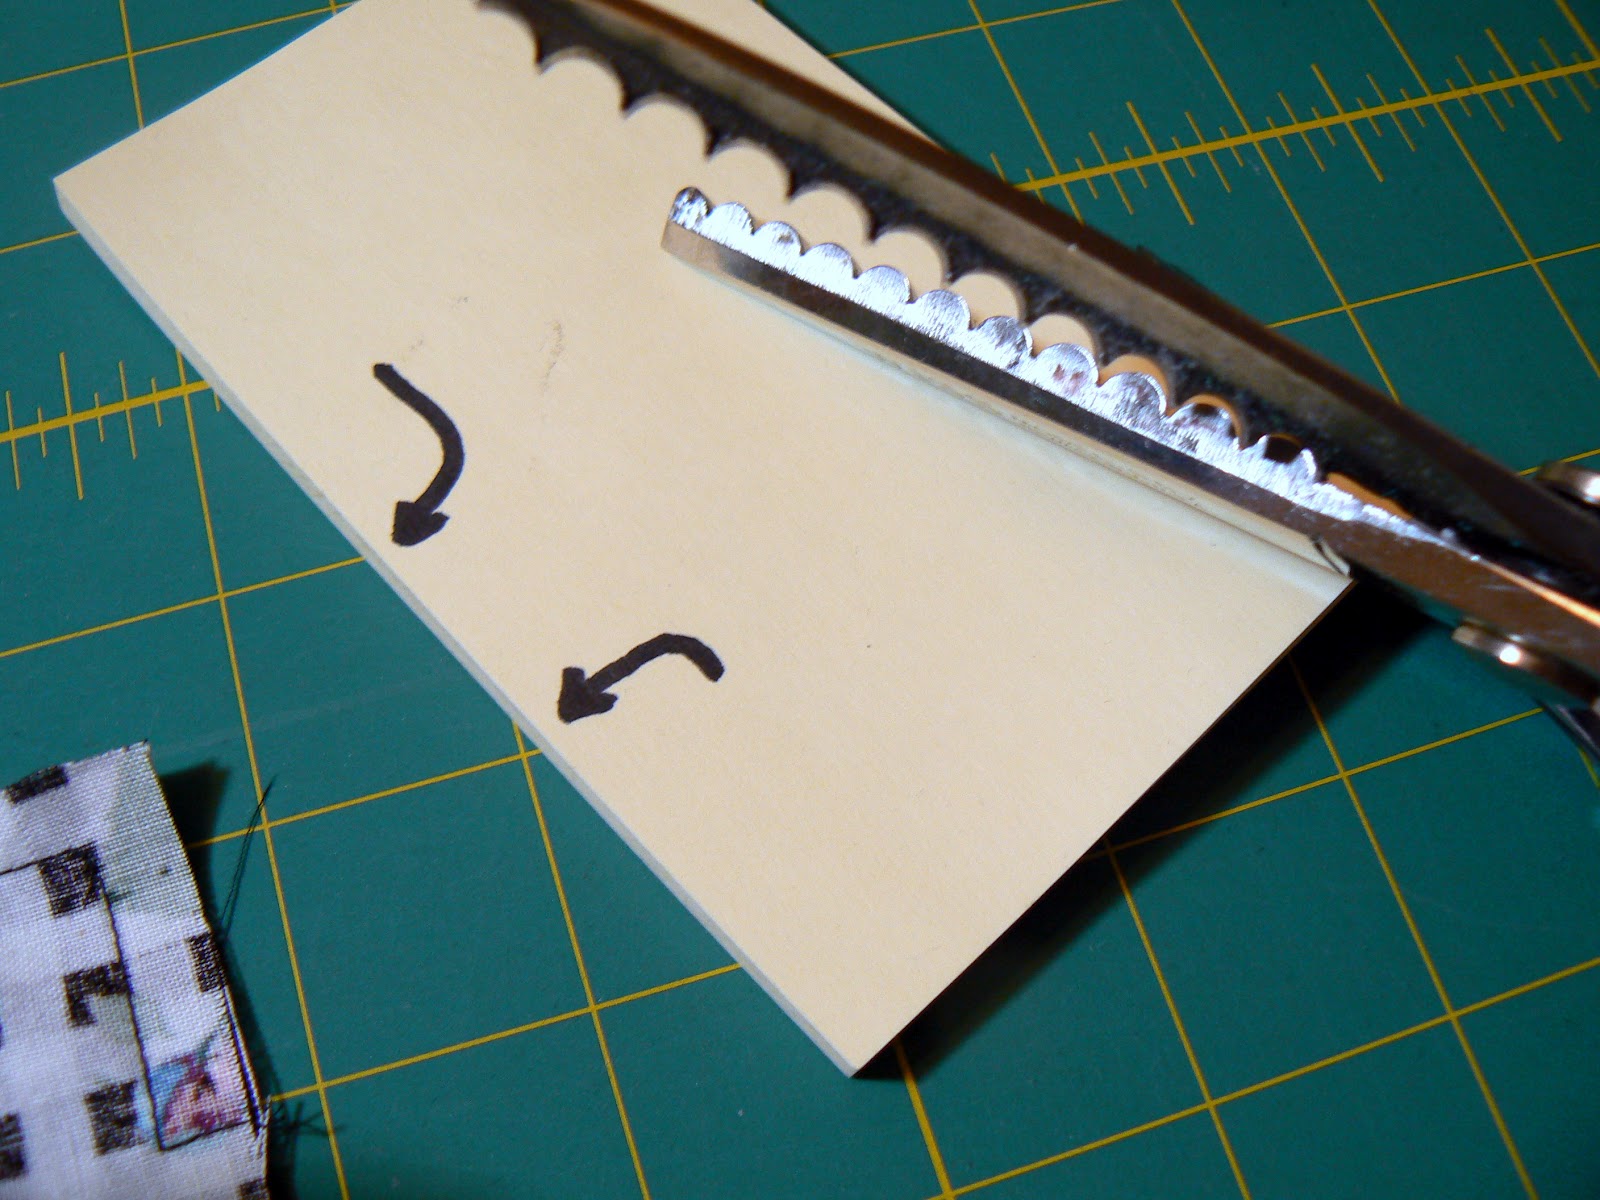
These are my scalloping shears... a gift from a wonderful seamstress friend, that lost her eyesight. I will always cherish these.   If you have a pair you can use them for trimming corners and curves!!  Pinking shears or regular shears work as well.  (please.. ignore the sticky note with the arrows.. it doesn't apply here) 

Great for corners  
(note that I took a diagonal stitch at the corner.. helps to make crisp corners once the fabric is turned to the right side)

Close to the thread, but don't clip your sewing!

Extra sweet for trimming curves!

Press your stitching before turning.  It sets the seam and makes for neat pockets.  (time to wash the ironing board cover again) 
Next I'm going to use one of the openings to turn the pocket right side out.


This is a tube turner. I think the brand name is Fasturn. I'm not sure if people still use them, but they are worth their weight in gold! I've had these forever, so I'm sure sure what method I'd use if I didn't.  You might try Eleanor Burns, of Quilt in a Day's method of using a large drinking straw with a ball-point bodkin..  or possibly using the eraser side of a pencil to push it through the opening would work too.  Or, you could have a 3rd opening ~at the top of the pocket and forgo the hassle ~ just remember my stitching tip for that opening too~  If you have a nifty method... please share!

Insert the tube through the opening to the far corner of the pocket.

Insert the wire (with the corkscrew end) into the tube and twirl the handle to the right to work through the fabric.  (Righty-tighty ~ Lefty-loosy)

The corkscrew is small/fine enough to go through the fabric without damaging it.  (I wouldn't try this with expensive or easily snagged fabric though ~like silk or satin!)

Gently pull the wire (with fabric) back into the tube. In this instance  you aren't  trying to  pull the whole pocket through the tube (you would do that for tubes or narrow ties)..... 

Just enough to be able to be able to pull the fabric with the tube turner, back out of the casing opening.  Carefully turn the handle on the wire (to the left) to release it from the fabric.  Then pull the pocket right side out.  Easy-peasy!

This is how the pocket looked freshly turned.   I usually have a chopstick around to poke out the corners, but hey, use what you got!  This paintbrush handle worked just fine.

Poke the corners out as much as possible without poking through your fabric, and work the round corners so they are nice and smooth.

See what I mean about the opening?  It's strong! And good thing, because turning fabric adds stress on the stitching there.

Look how nice it looks after a good pressing!  

Here is the pressed pocket.  
Now to add the casing and the elastic.

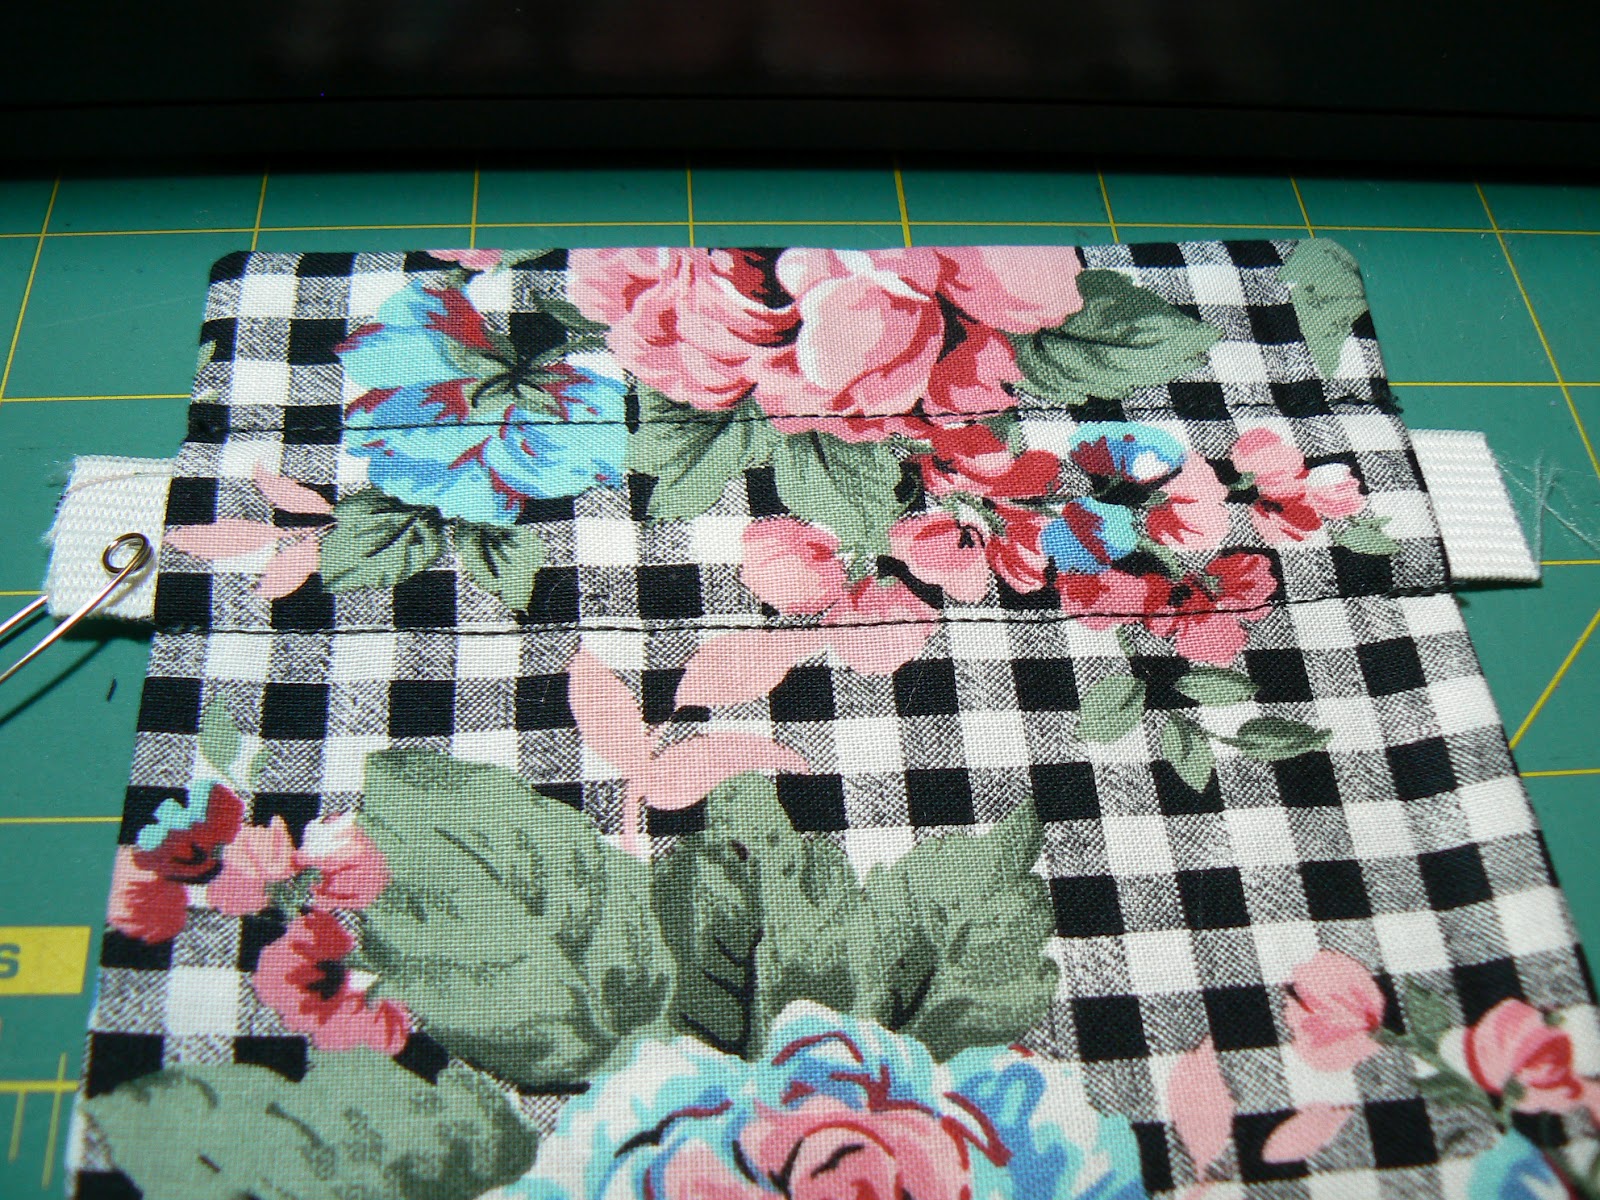
I double checked the measurement for the opening of the casing, and stitched 1" from the top of the pocket,...

And then again, 1" below that stitching.  Sometimes it helps to have a spot on your sewing machine throat plate to use as a guide for straight stitching. I'm using the far right of the metal part of my throat plate in this instance.  Or you could use your preferred way to temporarily mark the fabric.

Six inch lengths of elastic were cut for each pocket. 

Since we are gathering the pocket, and eventually cutting off the excess, 6 inches is more than enough.

Thought you might like to see the back of the pocket... !  

Mark the center of the elastic... and then mark where you are going to eventually cut the elastic (equal distances from the center mark).  If you want more gathers in the pocket, then you will mark your cutting line closer to the center line.  At this point you can play with it to see how you like the look the elastic creates.  I mark the elastic identically on both elastic pieces so matching pockets actually match!

Put the elastic through the casing with the extra on each side.

Line up your cutting line right next to the edge of the pocket, and pin the elastic in place.  You might want to pin further than I have, to allow you to stitch the elastic in place without removing the pin, to prevent the elastic from shifting.  Then stitch/double-stitch the elastic in place ~just stitch the casing area for this step. (1/4" seam is good, or however wide a seam you will be using when you top-stitch your pocket onto the skirt).

Here's another view of the back side of the pocket.


You can see your cutting line when you tug on the elastic after stitching it in place.   So when you DO cut the elastic,  it won't be visible.

I pushed the gathers to the center of the pocket to give me some stitching room to sew down the elastic.  (Sorry, I should have trimmed my threads before taking this picture.  Looks a bit messy!)


And there you have it.... a finished, lined pocket! ready to be top-stitched onto your market skirt.  Once your pocket is stitched onto the skirt, you can take out the pins and distribute the gathers evenly.

As far as placement on the skirt, determine where the center front is on the skirt body.  Eyeball how far you think the pockets should be from the center, or measure half-way between the center front and the sides.  Give enough room on the top and bottom for your waistband and ruffle seams, pin in place.  Top-stitch as close to the edge as you like (stitching over your previous stitching on the elastic casing) and reinforce your stitching at the top corners of the pockets for added strength.  Then continue constructing the skirt as instructed in Dana's tutorial.  

~*~

Please let me know if you have questions or suggestions about any of the steps.  (This is my first tutorial).  If you use my tutorial I'd like to know what you think, and how your project turned out.  Hope you liked it.  


Here's my little twirling granddaughter & her daddy (my SIL) at the wedding last summer!  The dress she's wearing is the inspiration for (and she's the recipient of) this particular market skirt!  Can't wait to see her again~ hopefully next month!

hmmm... gingham on the bias!  I'm making a mental note of that!  :D